
Getting Started with @smarter.sh/ui-chat

@smarter.sh/ui-chat is the chat window of Smarter, published on npm so that you can put it in your own React app. It’s the same component that the Smarter web console’s prompt engineering workbench uses, with a header with the chatbot’s name and logo, a message thread that renders Markdown, code, math and Mermaid diagrams, live progress while a prompt runs its tools, and a session that survives page reloads.
What makes it different from a general-purpose chat UI is how little you configure in your app. You build and run the chatbot, an LLMClient, on Smarter, and declare it in a YAML manifest, with its LLM, system prompt, tools, welcome message, colors and fonts. The component has one required prop, the LLMClient’s url, and loads everything else from the platform. Change the manifest, and every app that shows the chatbot picks up the change on its next chat session, with no rebuild.
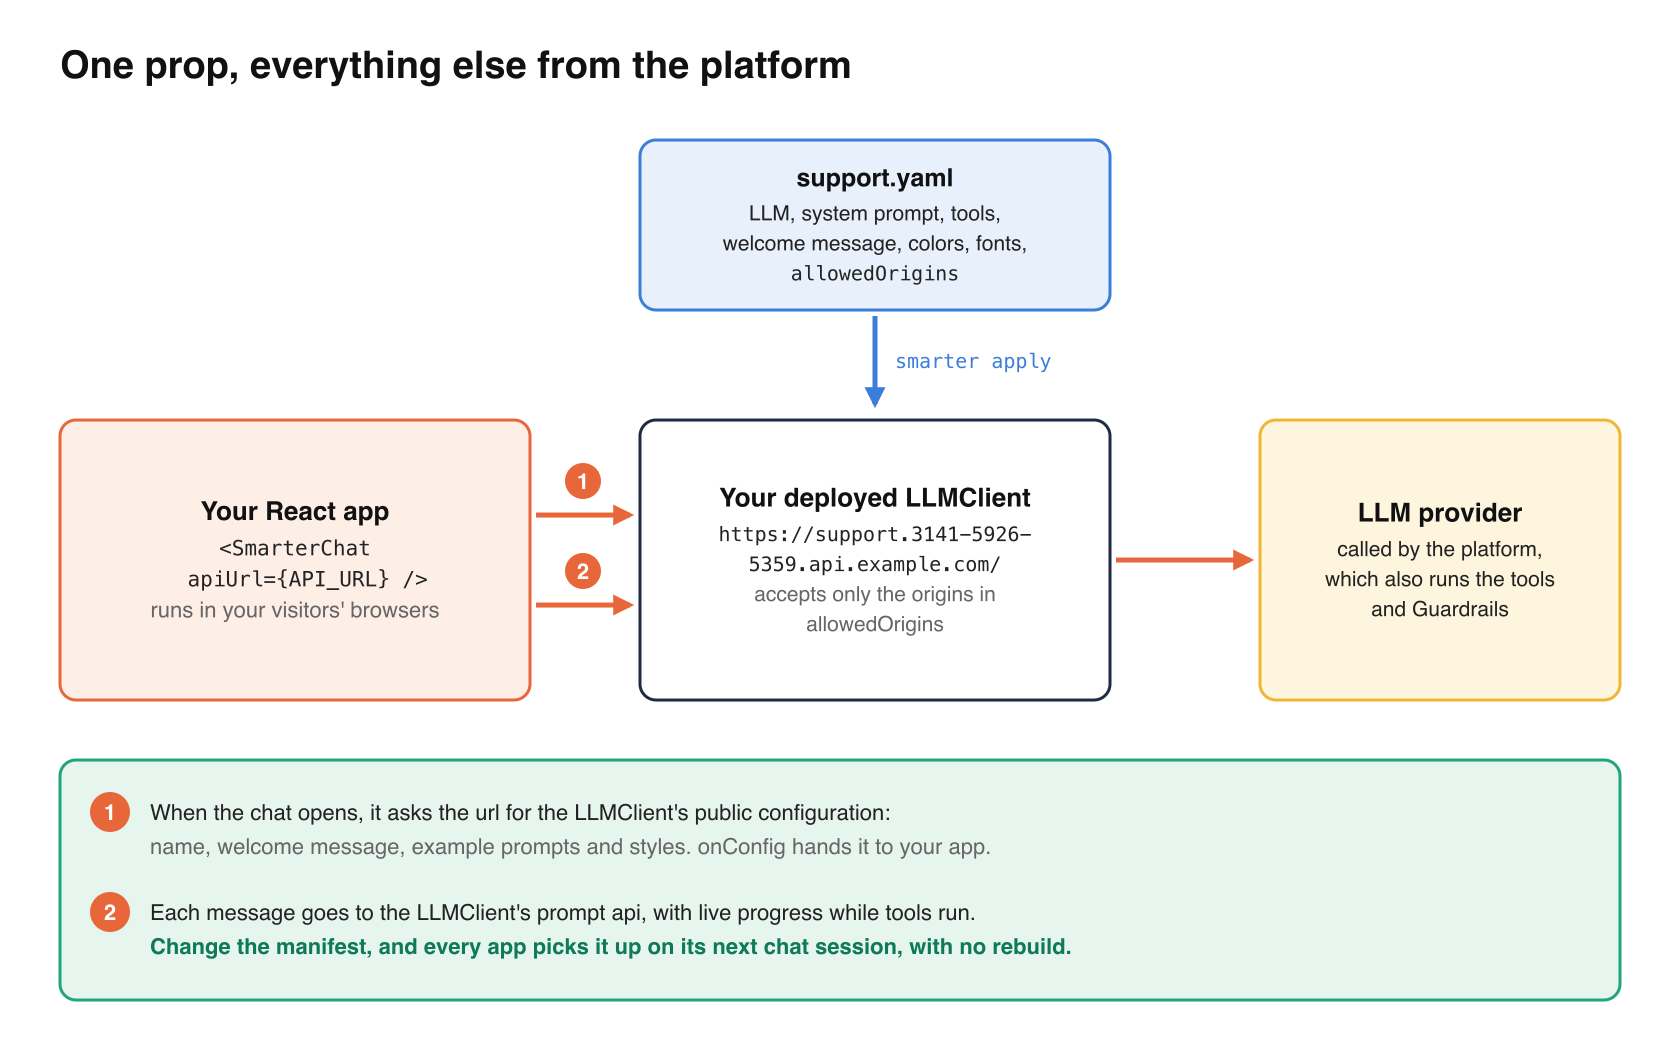
This article builds a small Vite and React app with a chat button in the corner, then shows how the app can follow the chat and add to it. If your site isn’t a React app, the package also has a prebuilt script that needs no build step at all. How to Embed a Smarter Chatbot in an HTML Web Page covers that.
Before you start
You need Node.js and a deployed LLMClient that allows your app’s origin. The chat calls Smarter straight from your visitors’ browsers, so Smarter has to know your site.
apiVersion: smarter.sh/v1
kind: LLMClient
metadata:
  name: support
  description: Customer support for example.com
  version: 1.0.0
spec:
  config:
    prompt:
      deployed: true
      provider: openai
      defaultModel: gpt-6-luna
      defaultSystemRole: You are a friendly support agent for example.com. Answer briefly.
      appName: Example Support
      appAssistant: Sam
      appWelcomeMessage: Hi, I'm Sam. How can I help?
      appExamplePrompts:
        - How do I reset my password?
        - What is your return policy?
      allowedOrigins:
        - https://www.example.com
        - http://localhost:5173
deployed: truegives the LLMClient a url of its own, such ashttps://support.3141-5926-5359.api.example.com/, or its verified custom domain. That url is the only thing your app needs.allowedOriginslists every origin that will show the chat. Scheme, host and port must match exactly.http://localhost:5173is Vite’s development server.
Apply it with smarter apply -f support.yaml. If you haven’t used the cli yet, Getting Started with Smarter’s CLI walks through it.
A deployed LLMClient without api keys is public, and its prompts are charged to its owner. If yours requires a key, the component sends one with each request, and anyone who can view your page can read it. Create a key used only for that site.
Create the app and install the package
npm create vite@latest my-site -- --template react-ts
cd my-site
npm install @smarter.sh/ui-chat
react and react-dom 19 are peer dependencies, which the Vite template already has. The package is written in TypeScript and ships its types.
Put the LLMClient’s url in .env.local, so that each environment can point at its own chatbot.
VITE_SMARTER_LLMCLIENT_URL=https://support.3141-5926-5359.api.example.com/
Import the stylesheets
Import two stylesheets once, in src/main.tsx.
import { StrictMode } from "react";
import { createRoot } from "react-dom/client";
import "@smarter.sh/ui-chat/dist/ui-chat.css";
import "katex/dist/katex.min.css";
import App from "./App";

createRoot(document.getElementById("root")!).render(
  <StrictMode>
    <App />
  </StrictMode>,
);
ui-chat.css is the component’s own CSS. katex.min.css styles math in the chatbot’s answers. It’s kept separate so that apps that never show math don’t download KaTeX’s fonts, and the package installs KaTeX for you. Without it, each equation appears twice, once as text and once as unstyled MathML.
Add the chat
Replace src/App.tsx with this.
import { useState } from "react";
import { HeaderButton, SmarterChat, type ChatConfig } from "@smarter.sh/ui-chat";

const API_URL = import.meta.env.VITE_SMARTER_LLMCLIENT_URL;

export default function App() {
  const [open, setOpen] = useState(false);
  const [config, setConfig] = useState<ChatConfig | null>(null);
  const [reloadKey, setReloadKey] = useState(0);

  return (
    <>
      <h1>Welcome to Example Co.</h1>
      <button onClick={() => setOpen(!open)}>
        {open ? "Close chat" : `Chat with ${config?.llmclient.app_assistant ?? "us"}`}
      </button>
      {open && (
        <div style={{ position: "fixed", right: 24, bottom: 80, width: 400, height: 600 }}>
          <SmarterChat
            apiUrl={API_URL}
            onConfig={setConfig}
            reloadKey={reloadKey}
            headerActions={<HeaderButton onClick={() => setReloadKey((k) => k + 1)}>Reload</HeaderButton>}
          />
        </div>
      )}
    </>
  );
}
Run npm run dev, open http://localhost:5173, and click the button. The chat opens in a panel with the LLMClient’s name, Sam’s welcome message and the two example prompts, all read from the manifest.
Here’s what each part does.
apiUrlis the only prop that the chat needs. The component asks the url for the LLMClient’s public configuration, then sends each message to the LLMClient’s prompt api.- The parent sets the size. The chat fills its parent’s width and height, so the parent must have a height. Here it’s a fixed panel in the corner. On a Support page, it could be a
divthat fills the main column. onConfigis called with the configuration each time it loads. This app uses it to put the assistant’s name on its button, showing “Chat with us” until the chat first opens, then “Chat with Sam”.ChatConfigis typed, so your editor completes its fields.headerActionsadds your own buttons to the chat’s header, after its own.HeaderButtonlooks like them.reloadKeyreloads the configuration whenever it changes. The Reload button uses it to pick up a manifest that you’ve just applied.
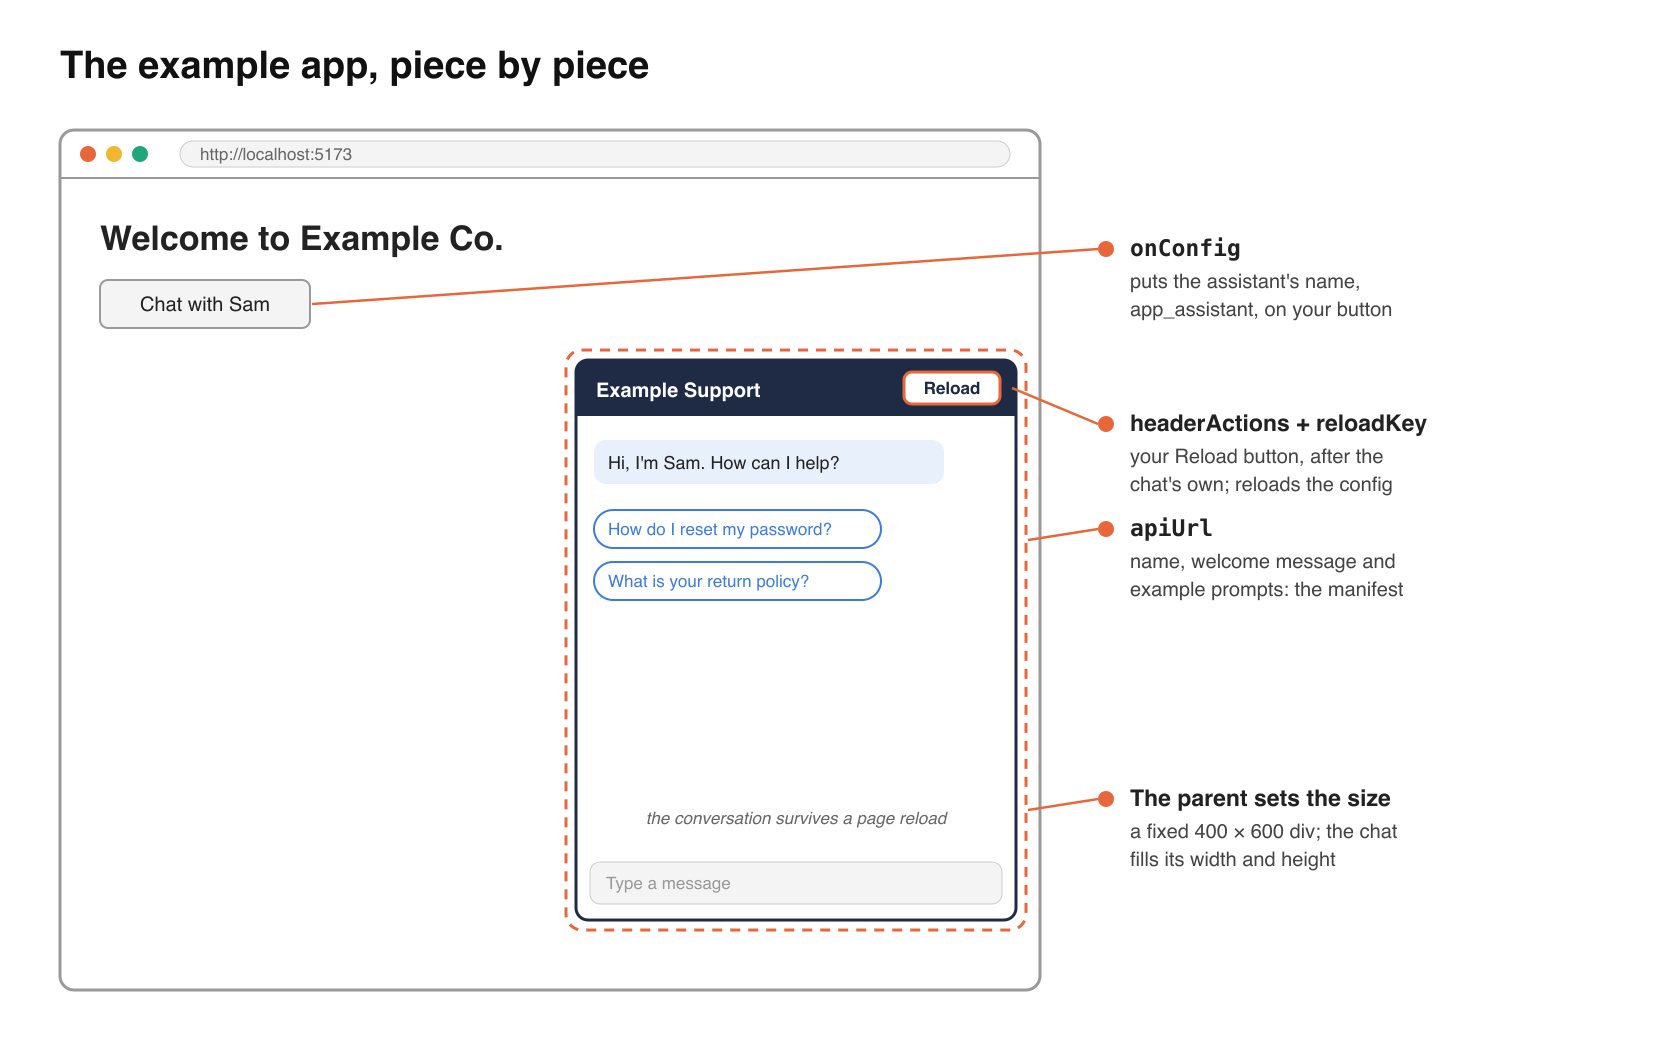
Close the panel, reload the page and open it again, and the conversation is still there. The chat keeps its session’s key in a cookie, and each LLMClient on a site keeps its own session.
What comes from where
The props control where and how the chat runs in your app. Everything else comes from the manifest, so there’s no prop for the welcome message, the colors or the model.
| You want to change | Where it’s set |
|---|---|
| The LLM, model, system prompt, name, welcome message and example prompts | The manifest’s spec.config.prompt |
| Its tools and safety, meaning Plugins, Functions and Guardrails | The manifest’s spec.plugins, spec.functions and spec.guardrails |
| Its logo, avatars, background image, font and colors | The manifest’s spec.config.styles |
| Where it appears in your app, and its size | Your app, in the parent element and the component’s props |
Styling the chat in the manifest means it looks the same in your app, on any other site that embeds it, and in the web console’s workbench.
spec:
  config:
    styles:
      appLogoUrl: https://cdn.example.com/logo.png
      googleFont: Nunito
      borderRadius: 0.7em
      conversationHeader: { backgroundColor: "#14213d", color: "#ffffff" }
      outgoingMessage: { backgroundColor: "#fca311", color: "#14213d" }
      buttons: { color: "#fca311" }
For anything the manifest doesn’t cover, the component’s elements have stable class names that start with smarter-chat-, under a root .SmarterChat element, and the manifest’s colors are set as --smarter-chat-* CSS custom properties that your own stylesheet can override.
Props worth knowing
Only apiUrl is required. These are the others that most apps use.
| Prop | Default | What it does |
|---|---|---|
apiKey | null | A Smarter api key, only if the LLMClient requires one. It’s visible to anyone who can view the page. |
language | the page’s | The language of the chat’s own text, en, es, fr or pt-br. The chatbot’s answers are in whatever language it answers in. |
streamProgress | true | Shows each LLM call and each tool, Plugin and MCP server call while a prompt runs. |
sessionCookieName | session_key | The cookie in which the chat saves its session’s key. |
debugMode | false | Logs to the browser console, for troubleshooting. |
The full list, including cookie, CSRF and tracing options, is in the package README.
Using it with Next.js
The component uses browser apis (cookies, localStorage and EventSource), so render it on the client only.
"use client";
import dynamic from "next/dynamic";
import "@smarter.sh/ui-chat/dist/ui-chat.css";
import "katex/dist/katex.min.css";

const SmarterChat = dynamic(() => import("@smarter.sh/ui-chat").then((m) => m.SmarterChat), { ssr: false });

export default function Chat() {
  return (
    <div style={{ height: "80vh" }}>
      <SmarterChat apiUrl={process.env.NEXT_PUBLIC_SMARTER_LLMCLIENT_URL!} />
    </div>
  );
}
Troubleshooting
| Symptom | Likely cause and fix |
|---|---|
| The chat is a thin strip | It fills its parent’s height, and the parent has none. Give it one. |
| The chat says it isn’t available, or the console shows “blocked by CORS policy” | Your app’s origin isn’t in allowedOrigins. http://localhost:5173 and http://127.0.0.1:5173 are different origins. Apply the manifest again with the right one. |
| 401 or 403 errors | The LLMClient requires an api key. Pass apiKey, using a key made for this site. |
| Equations appear twice | Import katex/dist/katex.min.css. |
document is not defined, or window is not defined, during a server render | The component ran on the server. In Next.js, load it with dynamic(..., { ssr: false }). |
Where to go next
- Read the full guide, Smarter Chat.
- Style every part of the chat with Styling Your LLMClient’s Chat.
- Give the chatbot tools with Plugins, and keep it safe with Guardrails.
- Not a React app? See How to Embed a Smarter Chatbot in an HTML Web Page, or How to Add a Smarter Chatbot to Your WordPress Site.
That’s the whole setup. Have fun with it!