Getting Started With Azure ML Studio Using Python

Azure Machine Learning Studio is Microsoft’s cloud workbench for training and serving machine learning models, and azureml-example is a free, open-source Python repository that I built to teach it. You clone it, add two small credential files, and within an afternoon you’ve registered a famous Kaggle dataset in your own Azure workspace, rented a cluster of cloud computers, asked Azure’s Automated ML service to train and rank dozens of models for you, and served the winner from a live HTTPS endpoint. Every step is a short Python command or a single az command that you can read, run and change.
I use this repository in my university courses and on the Full Stack With Lawrence YouTube channel, so it’s written for learners first. The code is small and heavily commented, every public function has a docstring, and the test suite covers 100% of the lines. If you’re learning Python and machine learning at the same time, this is a turnkey place to start, and a good example of what professional Python looks like.
This article assumes you’re new to most of it, including Azure, the Azure CLI, Kaggle, Docker, and the data science libraries pandas, seaborn, scikit-learn, SciPy and SHAP. Each one gets a short, plain introduction, with a picture, right before you need it.
What you’ll learn
- How Azure ML Studio organizes your work into subscriptions, resource groups and workspaces, and how Python connects to it.
- How to use the Azure CLI (
az) to log in, create a compute cluster and download a trained model. - How to download datasets from Kaggle with Python, and why
kaggle.jsonis a password. - What pandas, seaborn, scikit-learn, SciPy and SHAP each do, using the Titanic and Credit Card Fraud datasets that almost every data scientist learns on.
- How Automated ML (AutoML) tries many algorithms and picks the best one, and what cross-validation means.
- How to deploy a trained model as an Azure Function that answers HTTP requests.
- What Docker is, and how this repository uses it.
- How well-organized, well-tested Python code is put together, so that yours can look the same.
The big picture
Here’s the whole journey in one picture. The orange and yellow steps happen on your own computer, the blue steps happen in your Azure ML workspace, and the teal steps put the result on the internet.
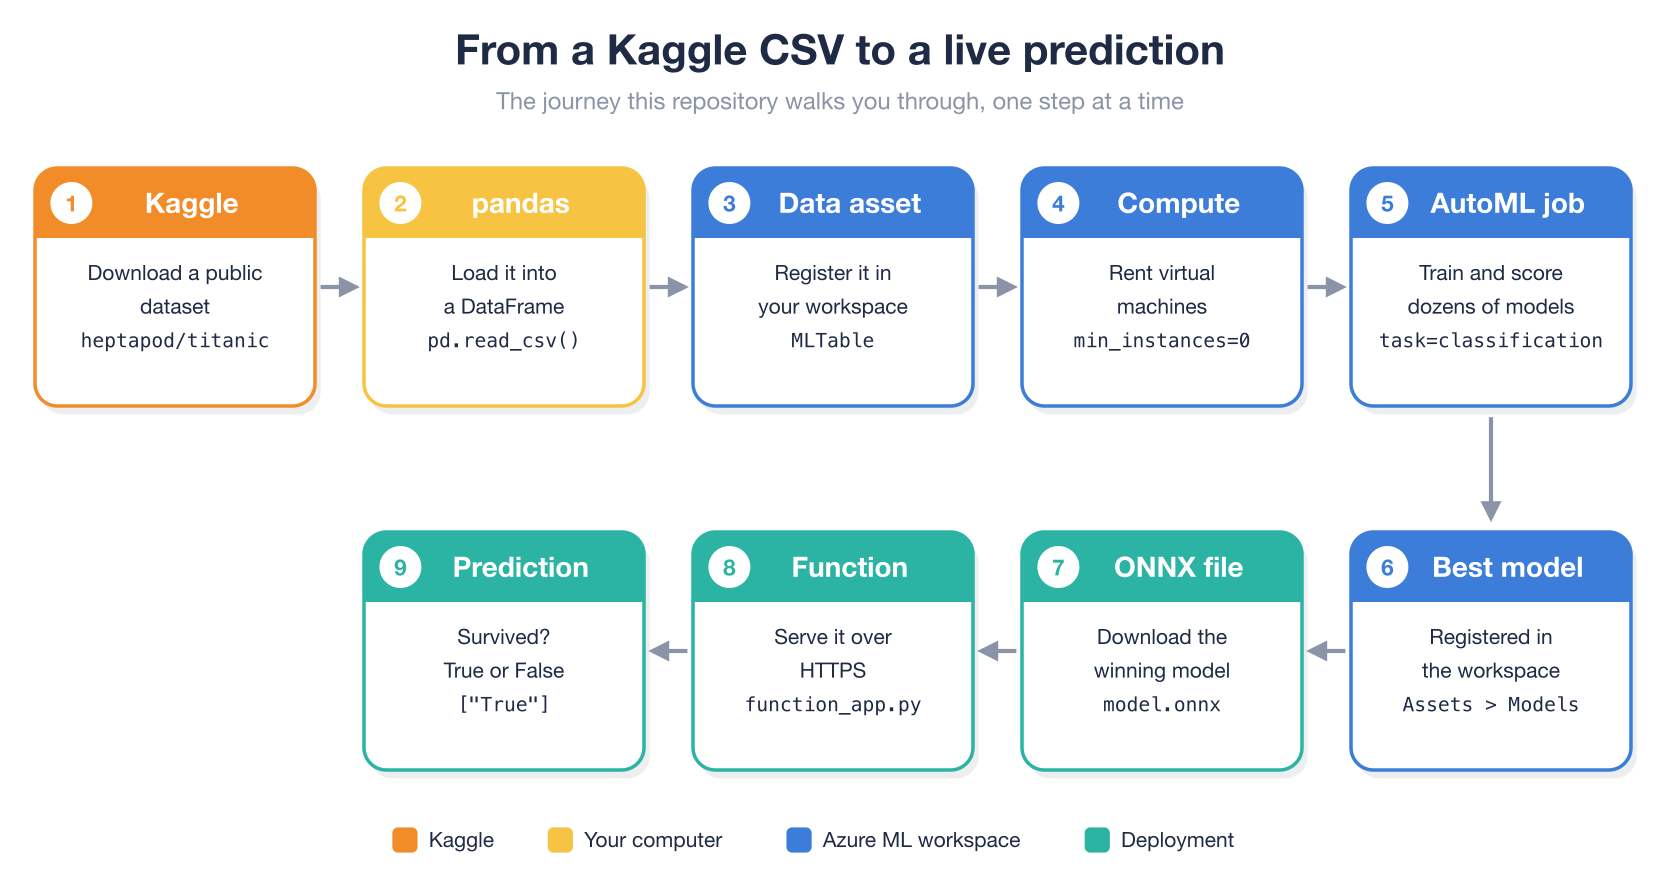
The example that runs through it is the Titanic. Given a passenger’s ticket class, sex, age, fare and so on, did they survive? It’s a small dataset (1,309 passengers), the question is easy to understand, and the answer is a simple yes or no, which makes it ideal for learning. A second example, credit card fraud, lives in a Jupyter notebook and shows a very different kind of machine learning, which I’ll come back to later.
What’s in the repository
| Folder | What you’ll find there |
|---|---|
azure_ai/ml_studio/ | Five helper classes, one per area of Azure ML Studio (workspace, data, compute, AutoML, batch endpoints) |
azure_ai/commands/ | Small command-line programs that you run with python3 -m azure_ai.commands.<name> |
azure_ai/tests/ | 84 unit tests, which run offline without touching Azure |
titanic-survival-app/ | An Azure Function that serves the trained Titanic model over HTTPS |
jupyter/ | Notebooks on credit card fraud, house prices and K-means clustering |
docs/ | Step-by-step guides for account setup, configuration, AutoML, deployment and the Azure CLI |
Dockerfile | A recipe for a ready-made Python 3.14 and Azure CLI environment |
It runs on Python 3.14 and the Azure Machine Learning SDK v2 (the azure-ai-ml package). That matters if you search the web for help. Microsoft retired the older v1 SDK (azureml-core and friends) in June 2026, and a lot of tutorials online still use it. If a code sample starts with from azureml.core import ..., it’s the old SDK and won’t run here.
A few new tools, introduced
Azure ML Studio and the Azure CLI
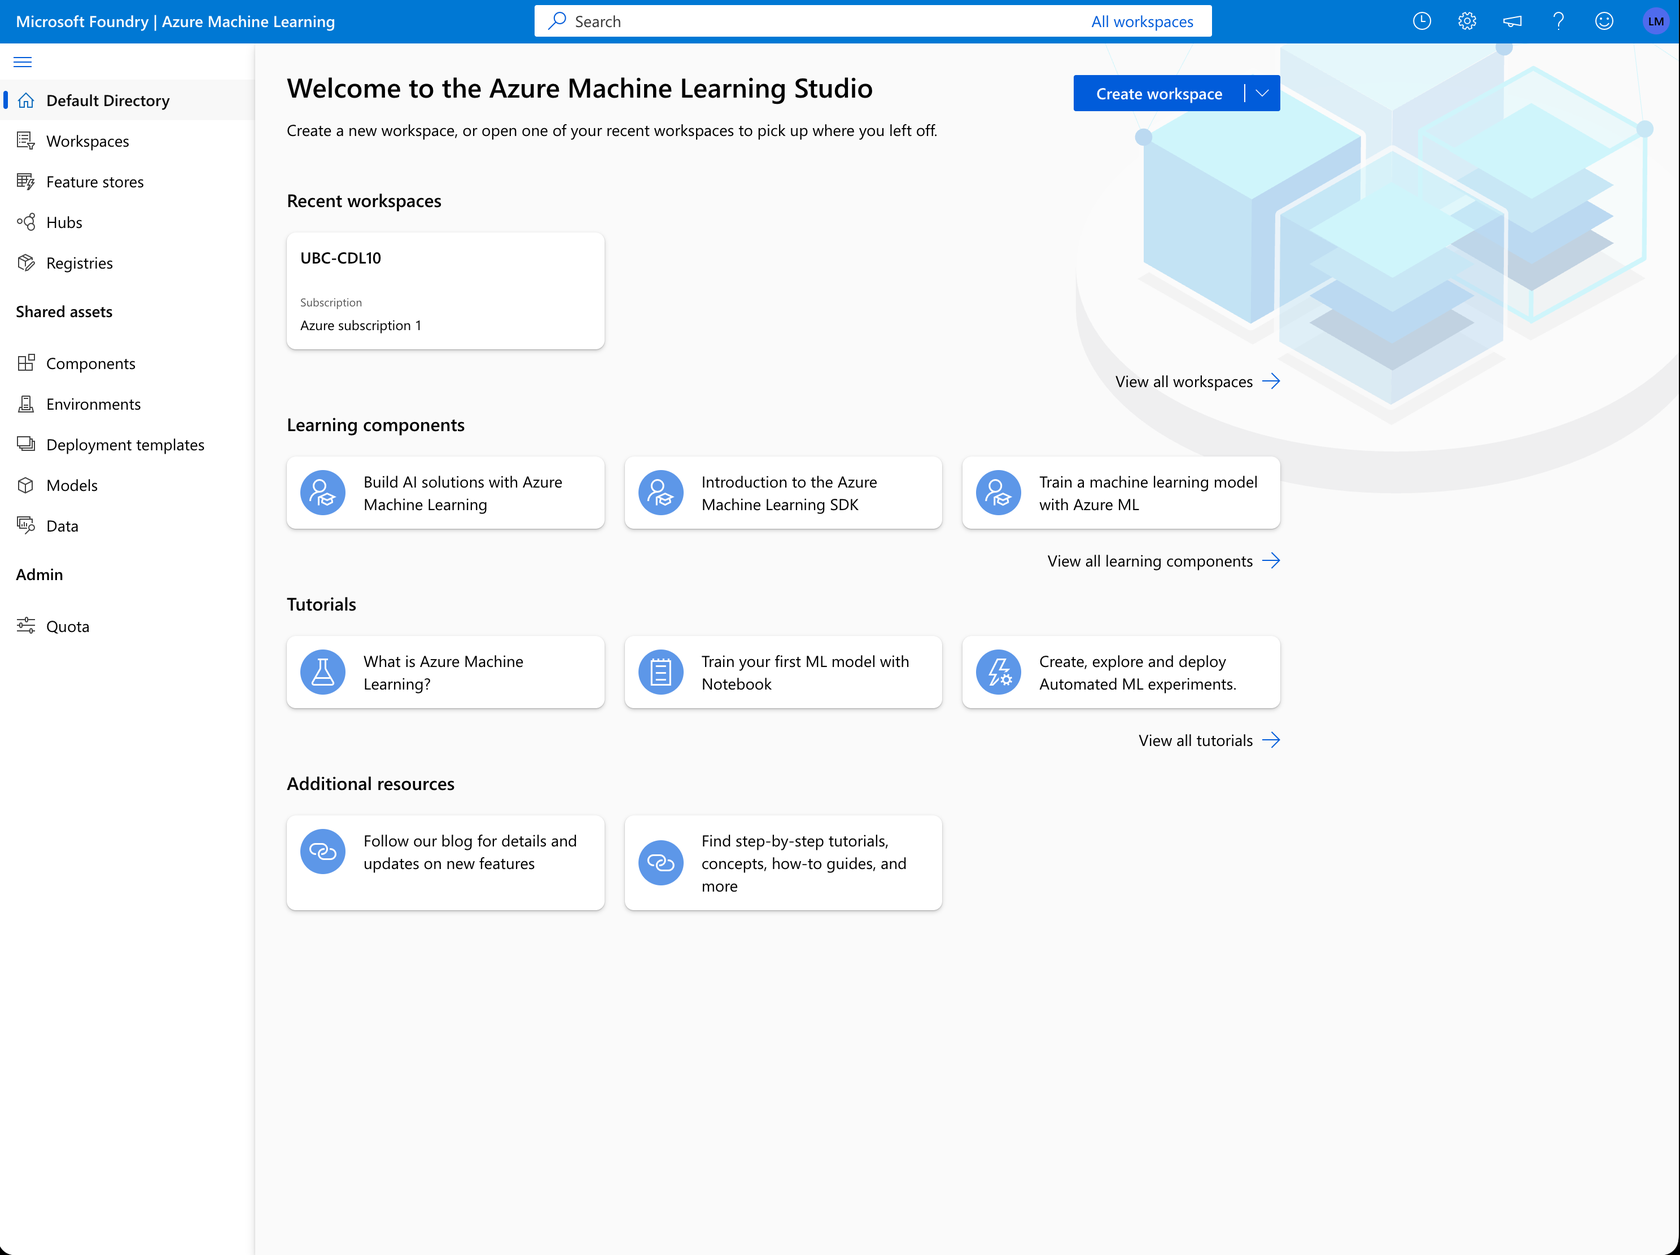
Azure organizes everything you create into nested containers. A subscription is the account that gets the bill. Inside it, a resource group is a folder for related resources, so that you can find them, and delete them, together. Inside that, an Azure ML workspace is the thing you see when you open ml.azure.com. It holds your datasets, your compute clusters, your training jobs, your trained models and your endpoints.
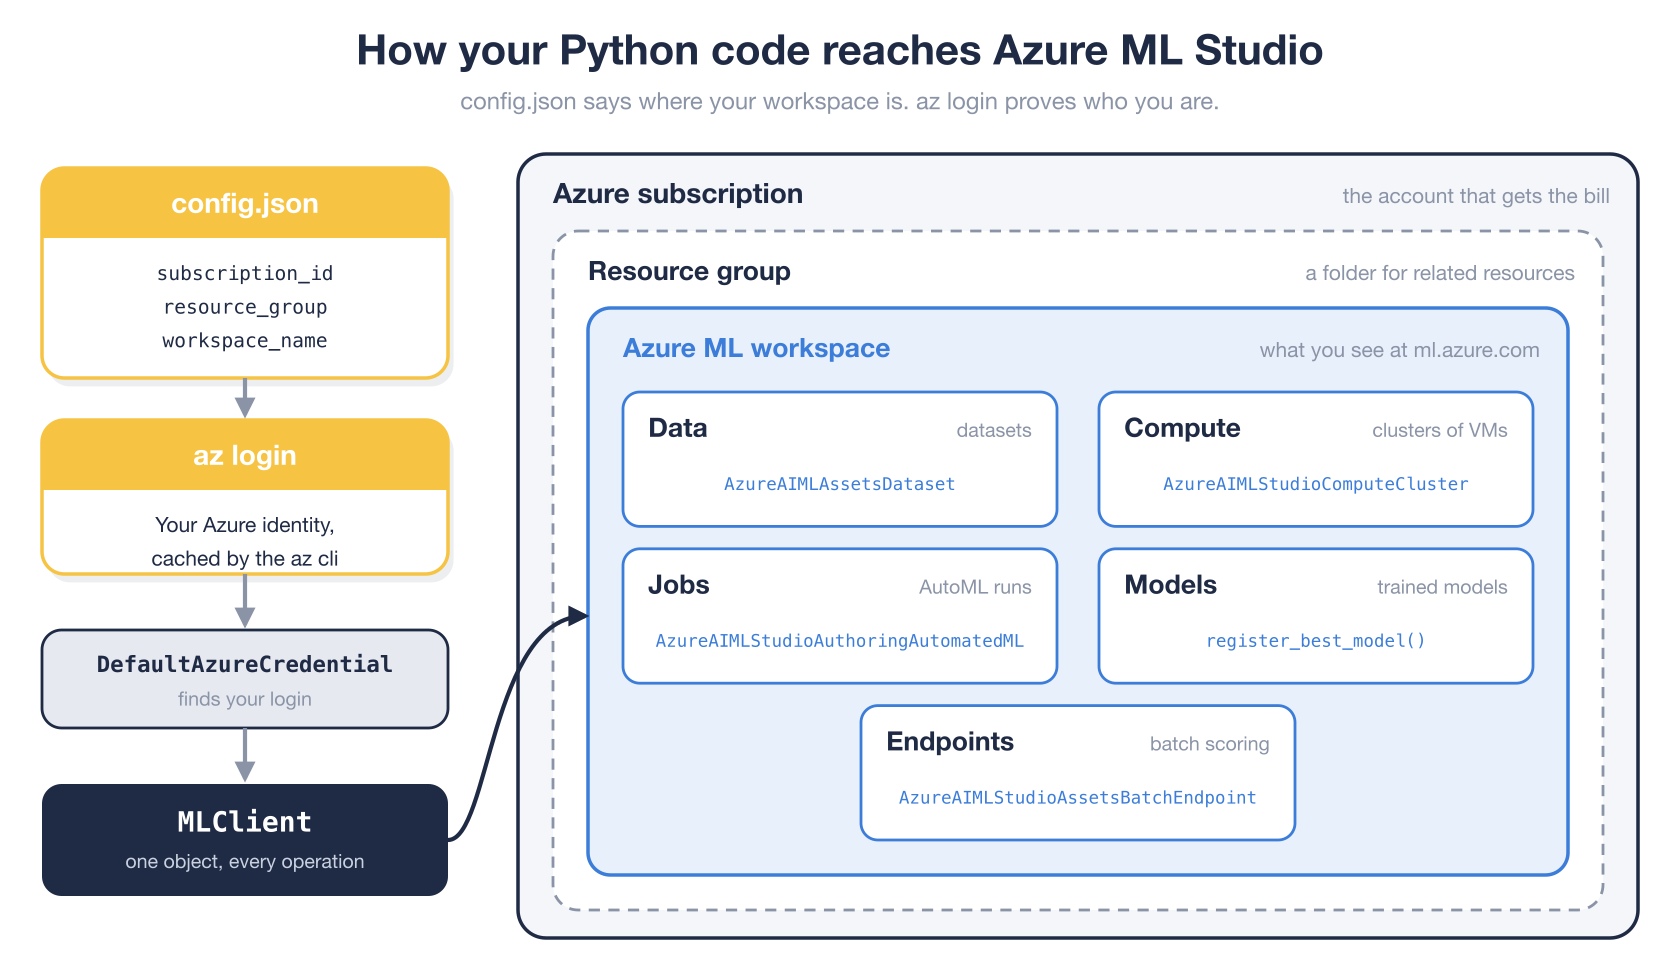
Your Python code needs two things to reach the workspace. First, it needs to know _where_ the workspace is. That’s config.json, a small file you download from the workspace’s overview page in the Azure portal, which holds the subscription id, the resource group name and the workspace name. Second, it needs to know _who you are_. That’s your Azure login. The Azure CLI, a command-line program called az, logs you in once with az login and remembers it. The Azure SDK’s DefaultAzureCredential then finds that login on its own, so there are no passwords in your code.
The Azure CLI does far more than log you in. Almost anything you can click in the Azure portal, you can also type as an az command, which is faster once you know it and much easier to repeat. The repository’s Azure CLI guide is a handy reference of the az ml commands you’ll use most.
Kaggle
Kaggle is a website, owned by Google, where data scientists share datasets and notebooks and compete to build the best models. It hosts tens of thousands of free datasets, including the two classics this repository uses, Titanic and Credit Card Fraud Detection. You can download a dataset by clicking a button, but it’s more useful to let Python do it, so that your work is repeatable.
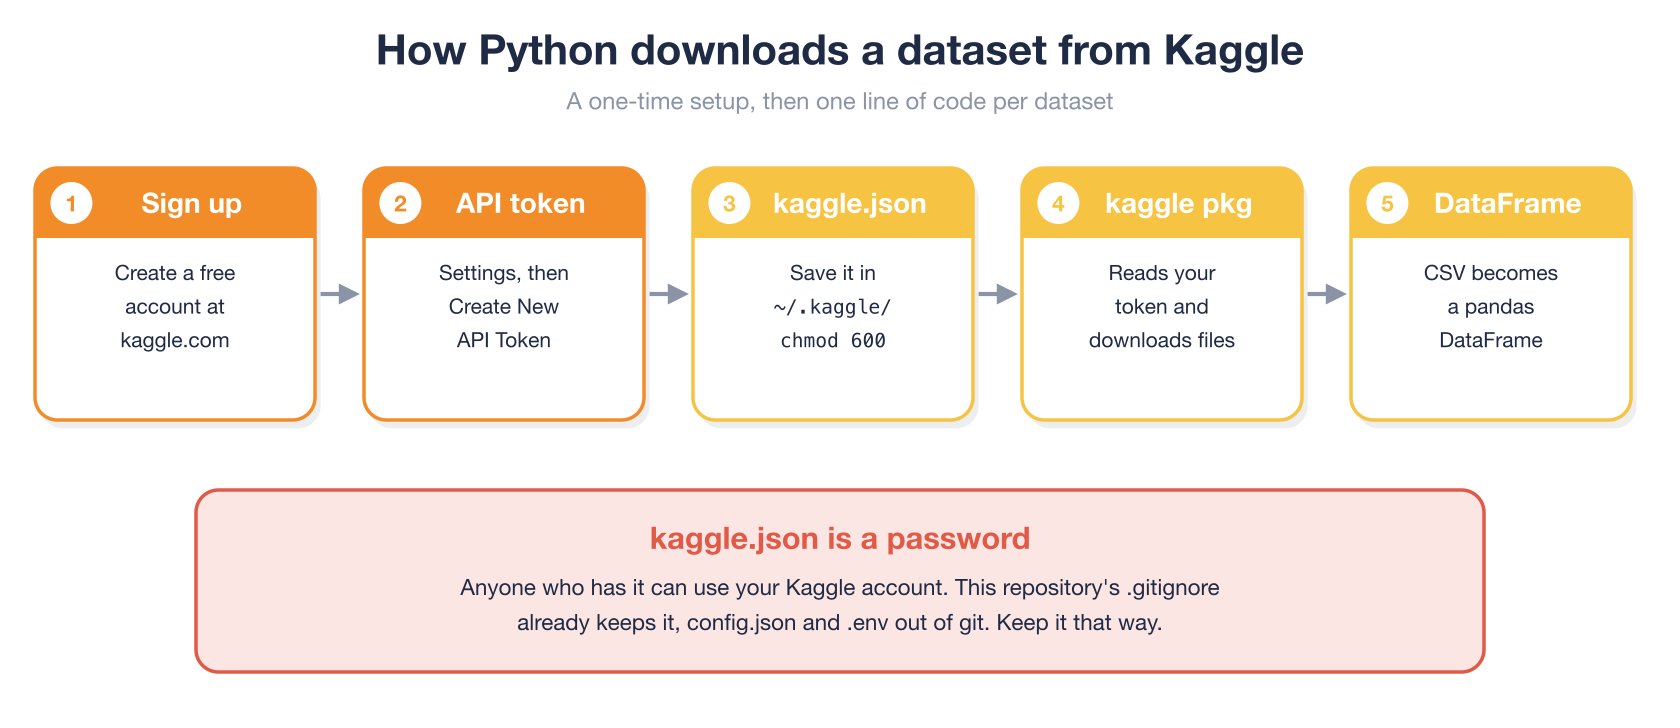
Kaggle’s Python package needs an API token, a file named kaggle.json that you create on your Kaggle account’s settings page. Treat it like a password, because that’s what it is. This repository’s .gitignore file already keeps kaggle.json, config.json and .env out of git, so you can’t commit them by accident.
The data science toolbox
Five open-source Python libraries do the data science work in this repository. You’ll meet each one in the notebooks.
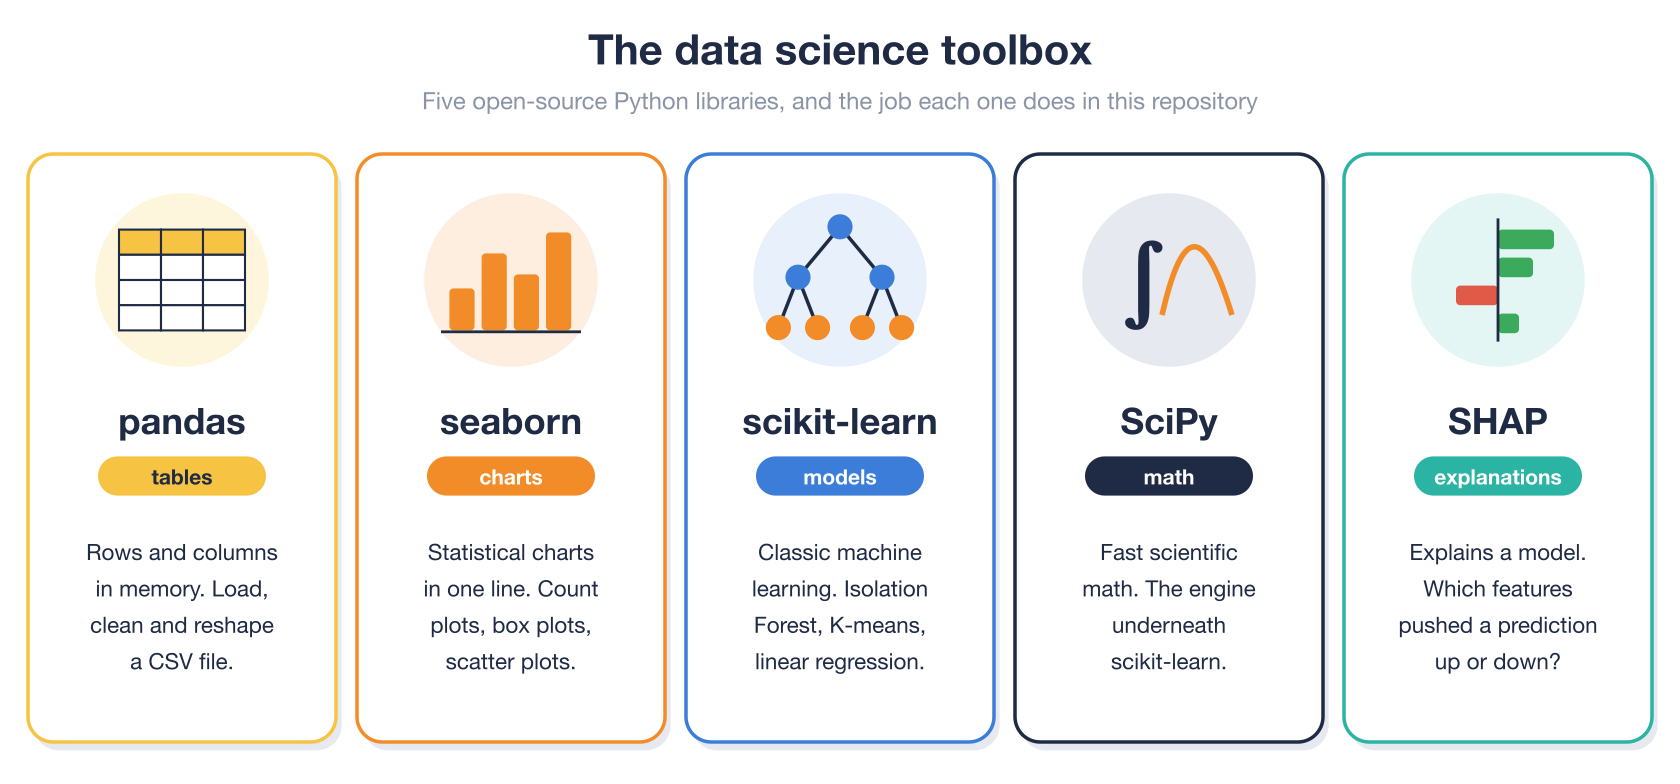
- pandas holds a table of data in memory, called a DataFrame. If you’ve used a spreadsheet, a DataFrame will feel familiar, with rows, named columns, and one line of code to load a CSV file, filter rows, or compute a column’s average.
- seaborn draws statistical charts from a DataFrame in one line, such as a bar chart of counts or a box plot comparing two groups.
- scikit-learn is the standard library of classic machine learning algorithms. Every model in it works the same way. You call
fit()to train it andpredict()to use it. - SciPy is a library of fast scientific math. You rarely call it yourself here, but scikit-learn is built on it.
- SHAP explains a trained model’s predictions, by measuring how much each input pushed a prediction up or down. More on that below.
Docker
Docker packages software together with everything it needs to run, so that it runs the same way on every computer. It has three ideas, and once they click, Docker makes sense.
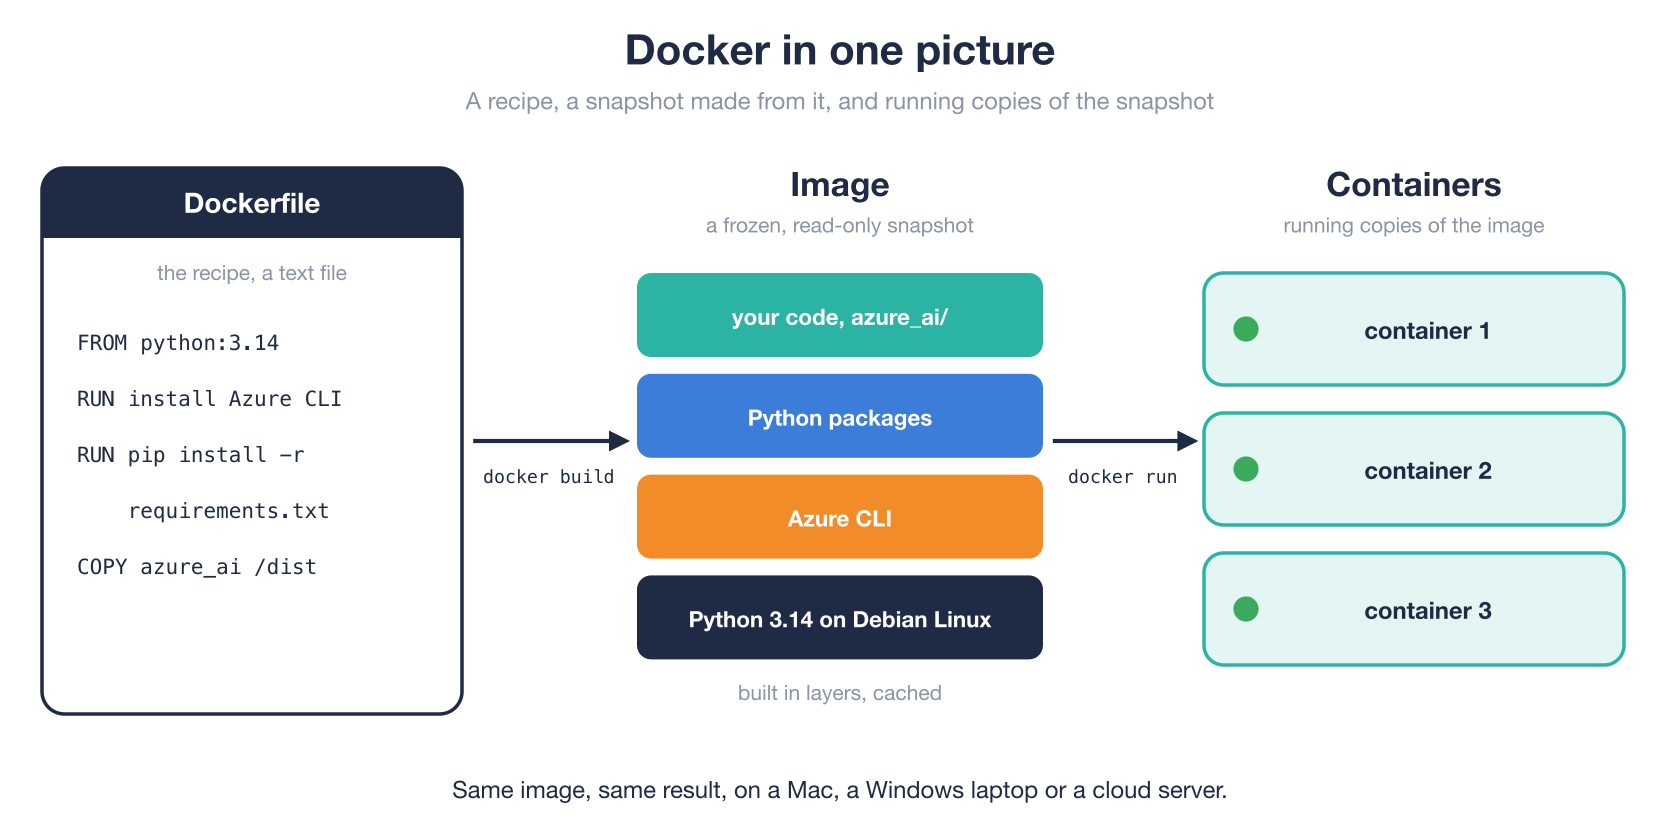
A Dockerfile is a recipe, a short text file of instructions. docker build follows the recipe and produces an image, a frozen, read-only snapshot of a small Linux computer with your software already installed. docker run starts a container, a running copy of the image. You can run many containers from one image, and throw them away when you’re done, without changing anything on your own computer.
This repository’s Dockerfile starts from the official Python 3.14 image, adds the Azure CLI and every Python package the code needs, then copies in the code. It’s useful when you can’t, or would rather not, install Python 3.14 and the Azure CLI on your own computer. You’ll find the commands in the setup section.
Setting up
You’ll need an Azure account with a paid subscription, because training models uses real cloud computers. The repository’s Azure Account Setup guide walks you through creating the subscription, a resource group and a workspace, both in the portal and with az commands, along with the quota settings that trip up most first-time AutoML users. You’ll also need Python 3.14, git, and a free Kaggle account.
Don’t let “paid subscription” scare you off. If you follow this article as written, your Azure bill will most likely come to less than one dollar. Almost all of it is the AutoML training run in step 4, which keeps one small virtual machine busy for about an hour, at around ten cents an hour. Storing the datasets and answering a few test requests from the Azure Function cost a few cents at most. The one way to spend more is to leave something running, so delete the resource group when you’re done, as shown in the section on costs near the end.
Install the Azure CLI and log in
On a Mac, install the Azure CLI with Homebrew. On Windows, download the installer from aka.ms/installazurecliwindows. Then add the machine learning extension and log in.
brew install azure-cli
az extension add -n ml
az login
az account list --output table
az account set --subscription "<your-subscription-name>"
az login opens your browser so you can sign in. The last two commands list your subscriptions and pick the one to use.
Clone the repository and build its virtual environment
git clone https://github.com/FullStackWithLawrence/azureml-example.git
cd azureml-example
make init
source venv/bin/activate
make init creates a Python virtual environment in a folder named venv, a private set of Python packages just for this project, and installs everything from the repository’s requirements files, including the Azure ML SDK, the Kaggle package and the five data science libraries. It also installs the pre-commit hooks that check code style, which I’ll come back to.
Add your two credential files
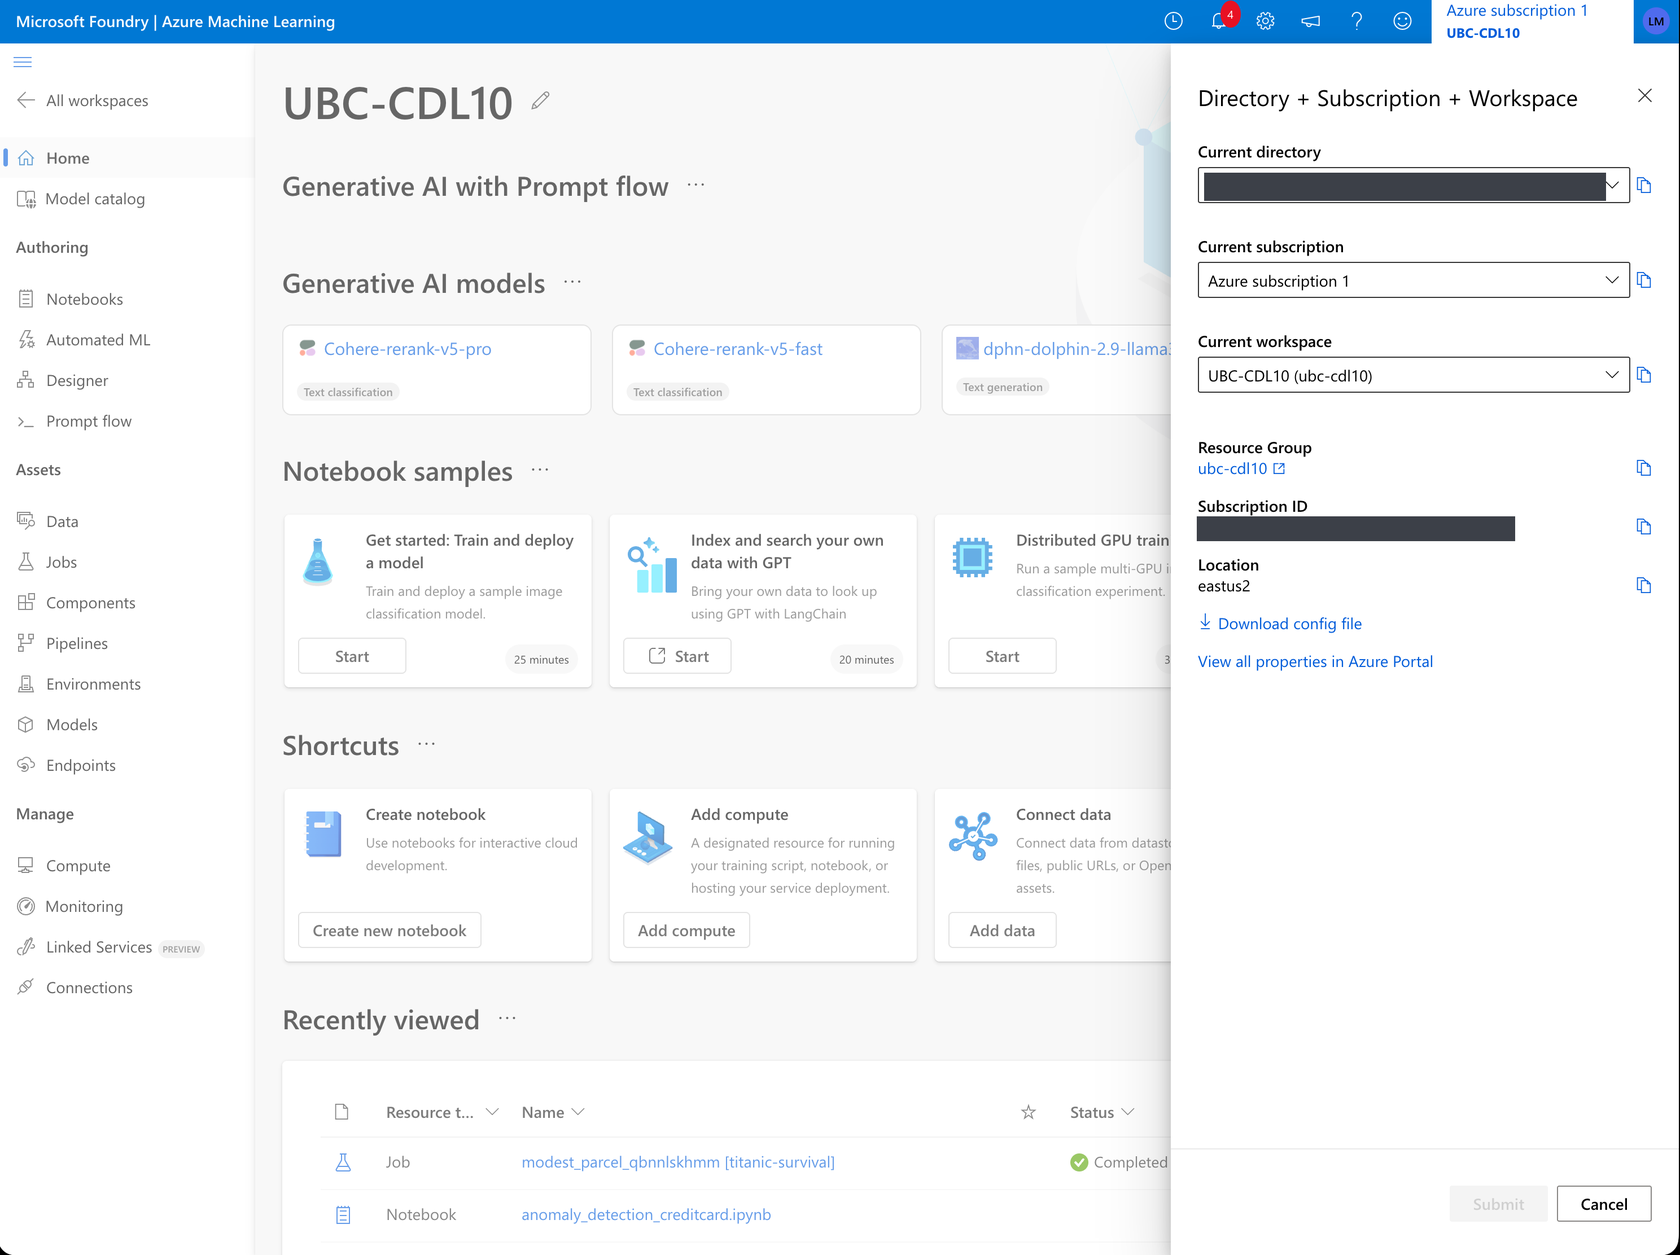
Download config.json from Azure ML Studio. Click your workspace’s name at the top right, then Download config file. Save it in the repository’s top folder. Then create your Kaggle API token on your Kaggle settings page and save it as ~/.kaggle/kaggle.json. The Azure ML Configuration Guide shows exactly where to click, and how to test the file.
Run the tests
make coverage
This runs the 84 unit tests in offline mode, where nothing touches Azure, and prints a coverage report. If they all pass, your Python environment is ready. It takes about a second, and it costs nothing.
Or use Docker instead
If you’d rather not install Python 3.14 and the Azure CLI on your computer, build the Docker image and work inside a container. az login --use-device-code prints a code that you type into a browser on your own computer, which is how you log in from inside a container.
docker build -t azureml-example .
docker run -it --rm -v "$PWD/config.json:/dist/config.json" azureml-example bash
az login --use-device-code
python -m azure_ai.commands.workspace
The -v option shares your config.json with the container, and --rm deletes the container when you exit, which keeps your computer tidy.
The walkthrough
From here on, each step does something in your Azure workspace. I’ll say which ones cost money.
Step 1. Connect to your workspace
python3 -m azure_ai.commands.workspace
This reads config.json, logs in with your az login, and prints a description of your workspace. If it works, everything else will too. It’s free.
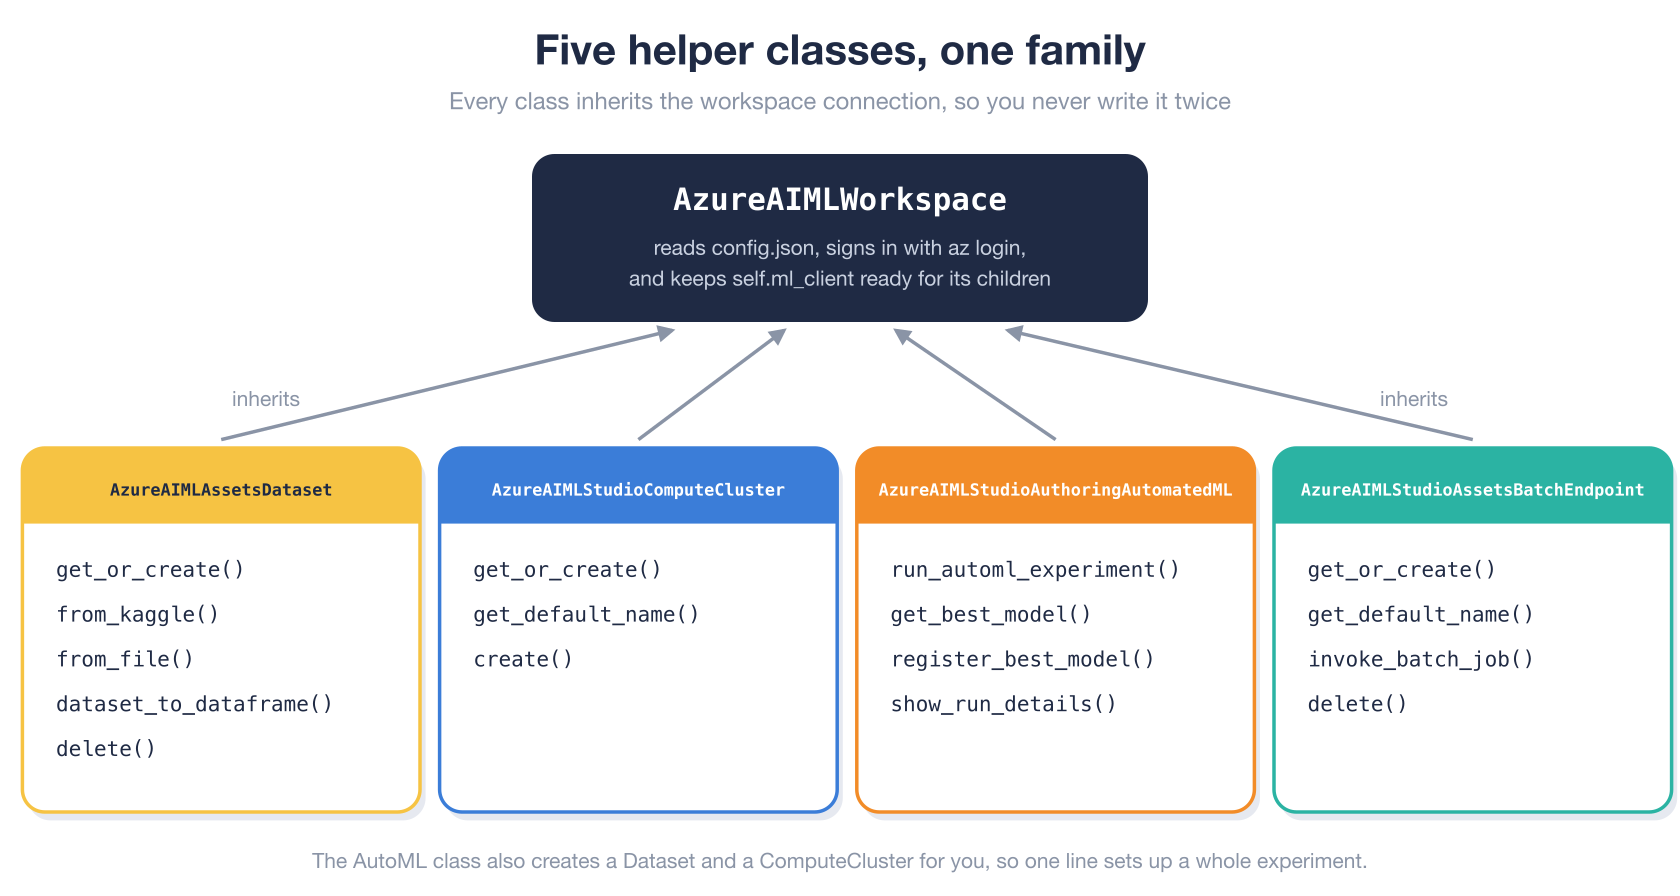
Behind that command is the class that every other helper class builds on, AzureAIMLWorkspace. It’s short enough to quote almost in full.
class AzureAIMLWorkspace:
    ml_client: MLClient
    workspace: Workspace | None

    def __init__(self):
        load_dotenv()
        self.ml_client = self.connect_workspace()
        self.workspace = self.ml_client.workspaces.get(self.ml_client.workspace_name)

    def connect_workspace(self) -> MLClient:
        try:
            return MLClient.from_config(credential=DefaultAzureCredential())
        except ValidationException as e:
            logger.error("Failed to connect to Azure ML workspace: %s", e)
            raise e
MLClient is the Azure ML SDK’s front door. Datasets, compute, jobs, models and endpoints are all reached through it, as ml_client.data, ml_client.compute, ml_client.jobs and so on. The other four helper classes inherit from this one, so they all get a ready-made ml_client without repeating any of this.
Step 2. Register the Titanic dataset from Kaggle
python3 -m azure_ai.commands.dataset_from_kaggle heptapod-titanic heptapod/titanic
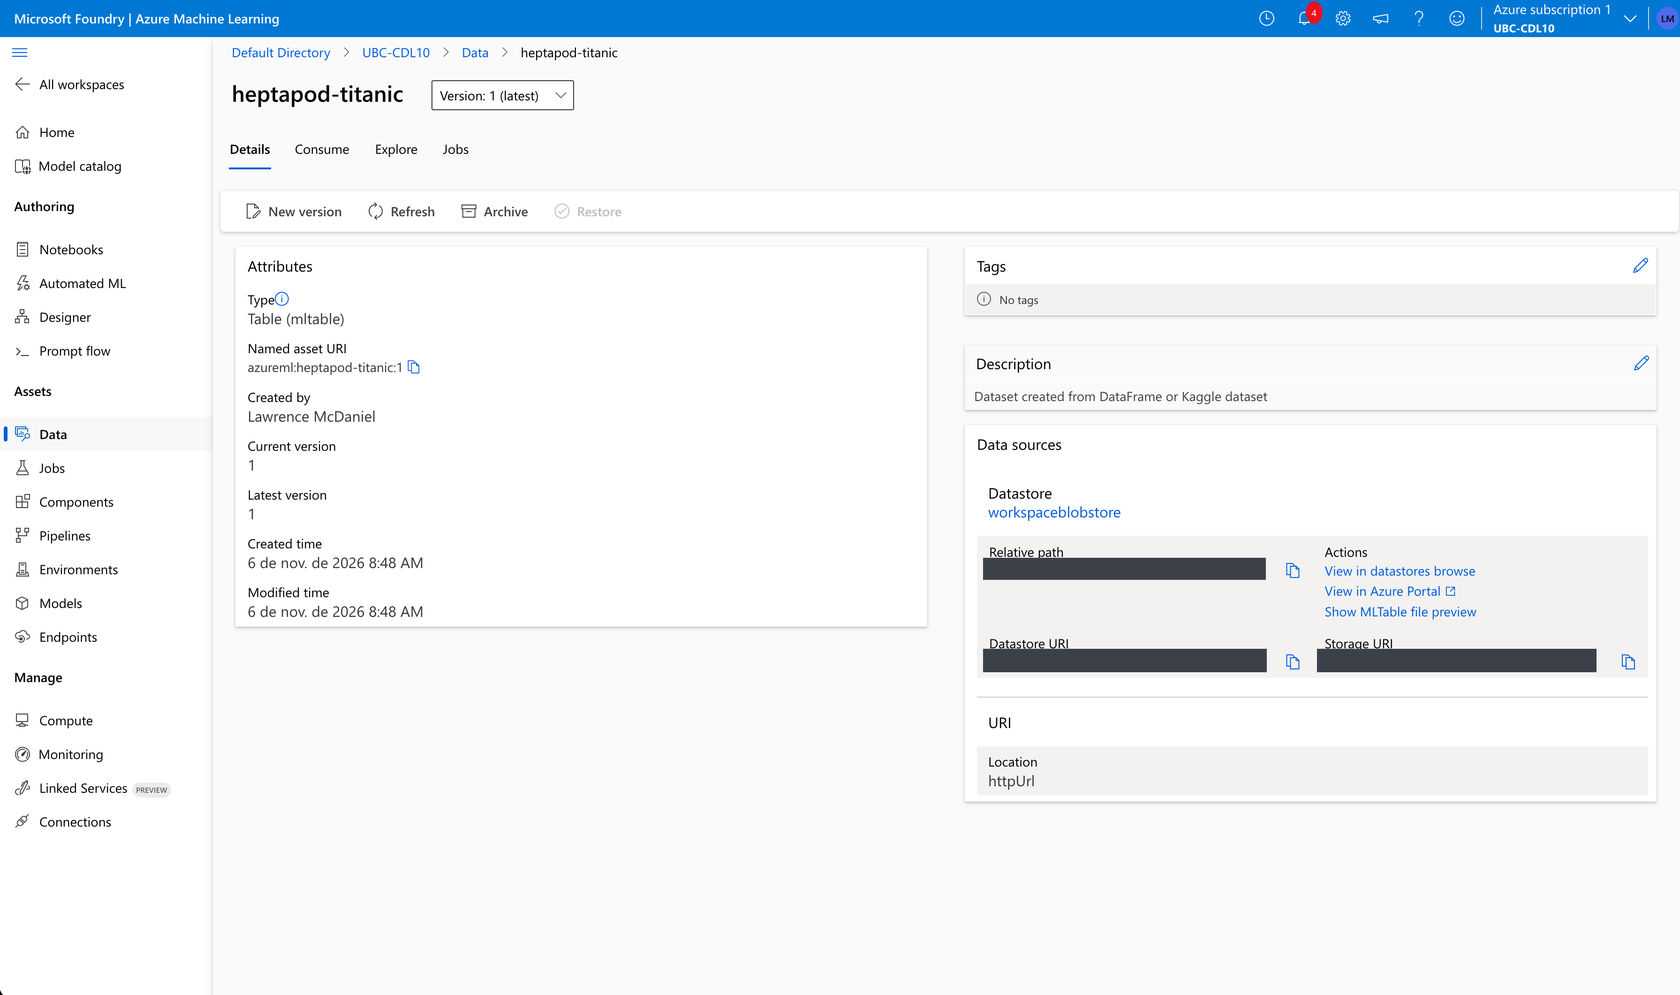
This downloads the heptapod/titanic dataset from Kaggle, loads it into a pandas DataFrame, and registers it in your workspace as a data asset named heptapod-titanic. Then it prints the first five rows, so you can see what you’ve got. You’ll find it in Azure ML Studio under Assets, then Data.
One quirk of this dataset is worth knowing before you train on it. The column that says whether a passenger survived is spelled 2urvived, with a “2” where the “S” should be. It’s a typo in the dataset itself, and you’ll need to spell it that way.
The second quirk is more serious, and it’s a lesson in itself. Only 342 of the 1,309 passengers are marked as survivors. The 418 passengers that Kaggle’s original Titanic competition kept back as a test set, whose fates were secret, are all labeled 0 in this version, as if none of them survived. A model trained on it learns that almost nobody survived, and it will tell you that a first-class woman probably drowned. Nothing in AutoML can spot a mistake like that for you. Always look at your data before you trust a model built from it. Counting the values in the target column with pandas, df["2urvived"].value_counts(), would have caught this one in a second.
A data asset is stored as an MLTable, a folder holding your data as a CSV file plus a small file that tells Azure how to read it. AutoML only trains on MLTable data assets, which is why the helper class takes care of that for you.
The class behind this command, AzureAIMLAssetsDataset, shows a pattern that every helper class in the repository follows, called get_or_create(). It’s idempotent. It looks for the data asset first, and only builds a new one if it doesn’t exist, so calling it twice leaves your workspace exactly as calling it once does.
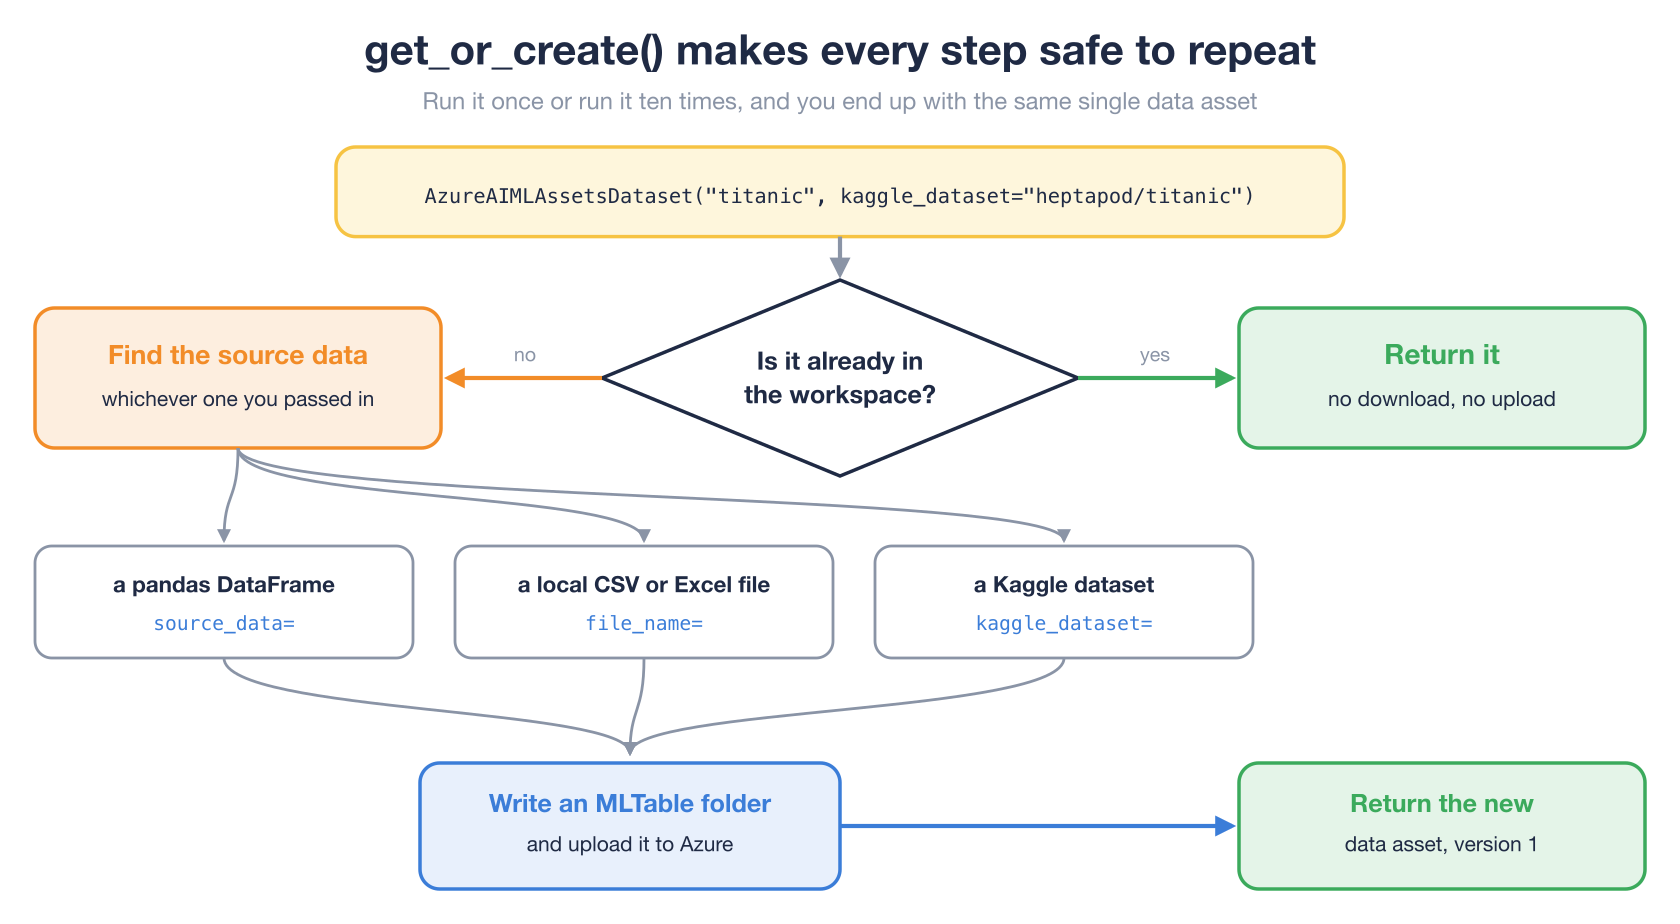
Idempotence is one of the most useful properties that code which manages cloud resources can have. You can rerun any step, or a whole notebook, without making duplicates or paying for something twice. The same class can also register a DataFrame you’ve built yourself, or a local CSV or Excel file.
python3 -m azure_ai.commands.dataset_from_file maths azure_ai/tests/data/maths.csv
Step 3. Create a compute cluster
A compute cluster is a group of virtual machines that Azure rents to you by the minute. AutoML runs its training on one. This az command creates a small, inexpensive one.
az ml compute create \
  --name tiny-cluster \
  --type amlcompute \
  --resource-group <resource-group> \
  --workspace-name <workspace-name> \
  --size Standard_D2s_v3 \
  --min-instances 0 \
  --max-instances 1 \
  --idle-time-before-scale-down 120
The two settings that protect your wallet are --min-instances 0 and --idle-time-before-scale-down 120. Together they mean the cluster shrinks to zero machines two minutes after its last job, and an empty cluster costs nothing. Standard_D2s_v3 is a small machine with 2 CPUs and 8 GB of memory, which is plenty for 1,309 passengers, and it fits inside the default quota of a new subscription.
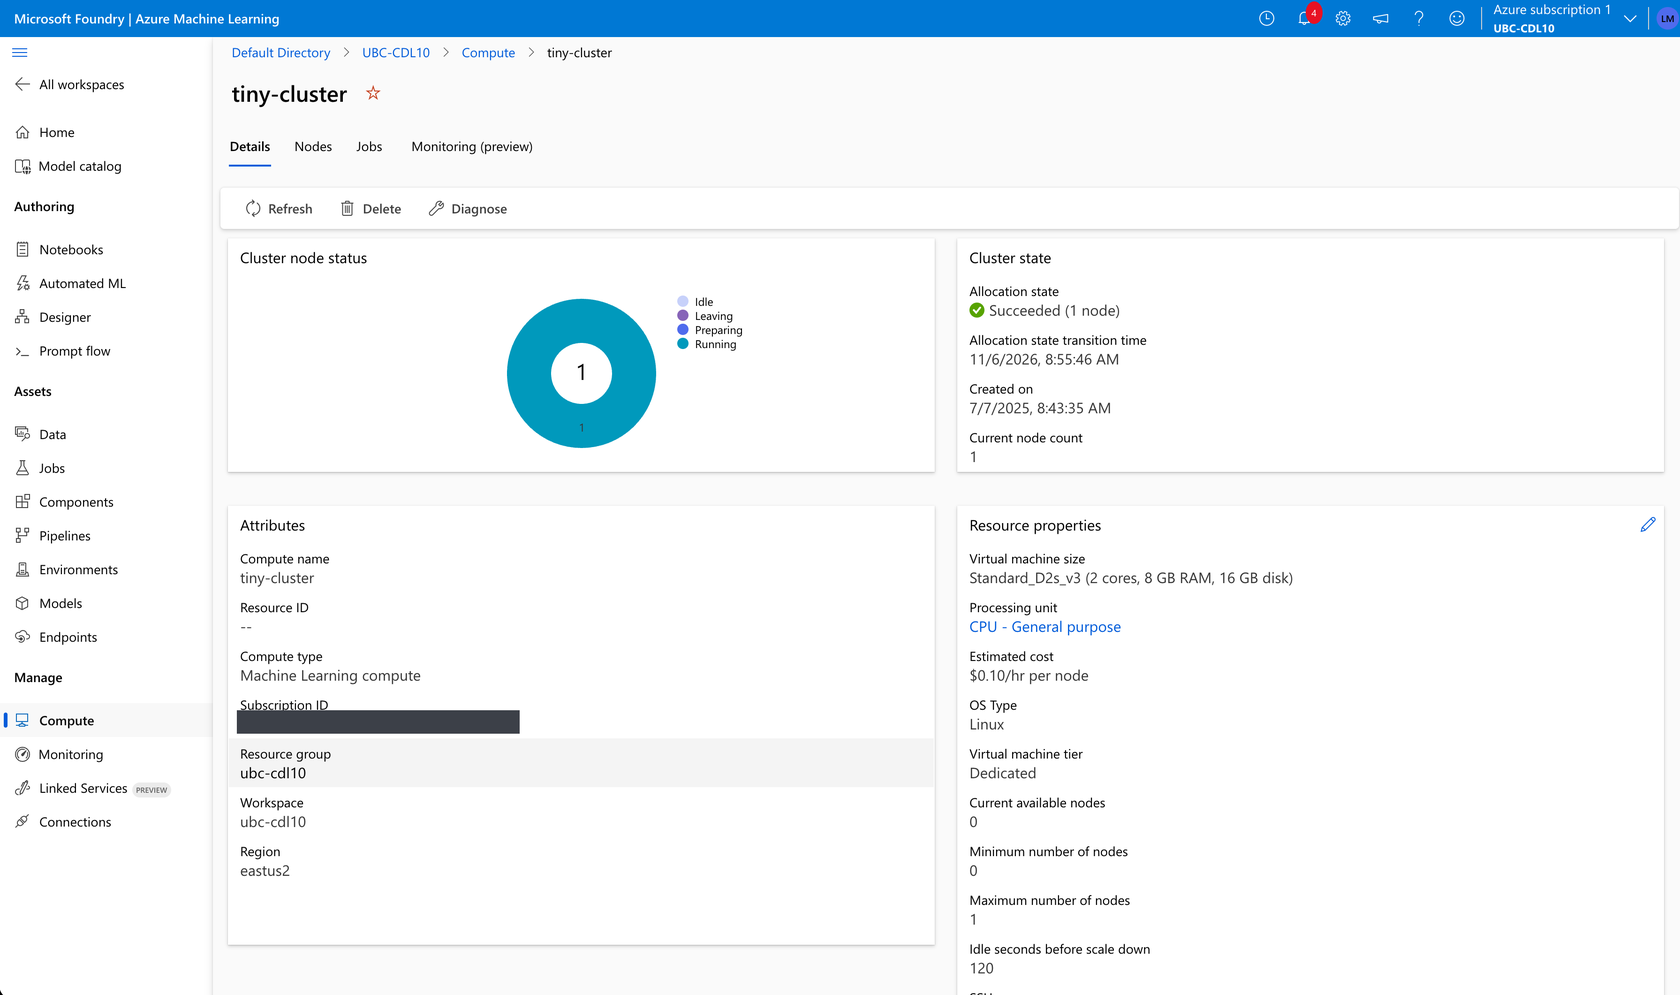
You can do the same from Python, with python3 -m azure_ai.commands.compute_cluster tiny-cluster. Because of get_or_create(), that command simply finds the cluster you just made.
Step 4. Train with Automated ML
Here’s where Azure ML Studio earns its keep. Choosing a machine learning algorithm, and its settings, is normally a long process of trial and error. Automated ML, or AutoML, does the trial and error for you. You give it a dataset, the column to predict and the kind of problem, and it trains one model after another, each with a different algorithm or different settings, and scores each one fairly.
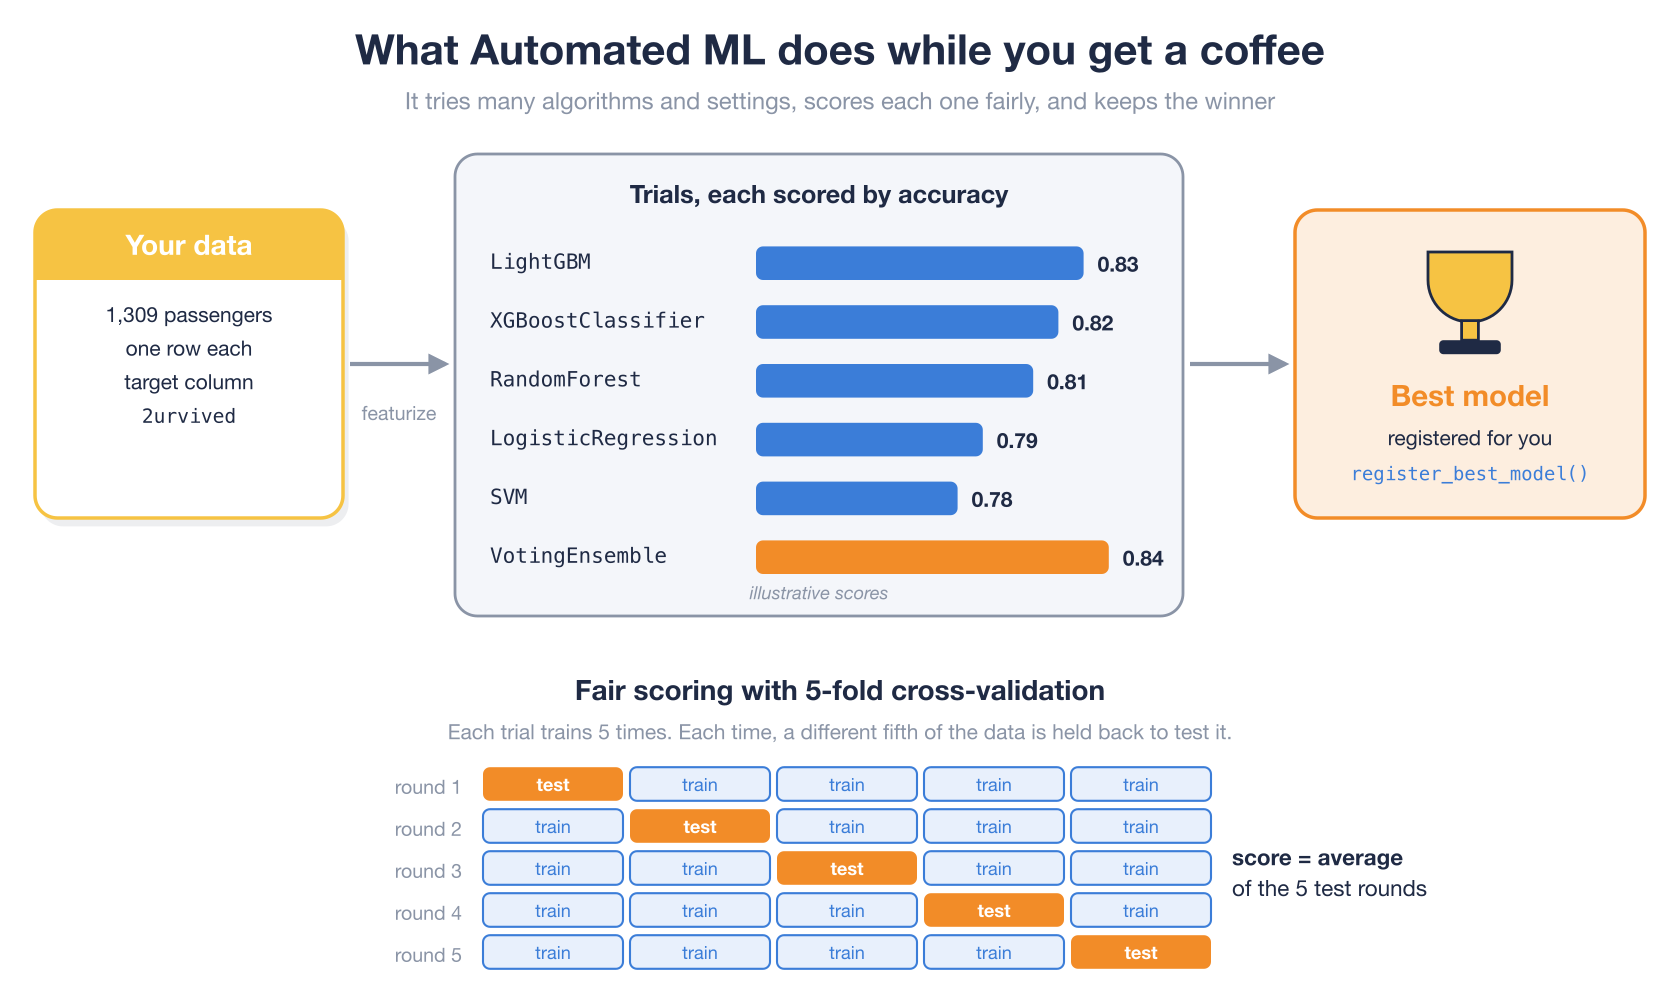
Each attempt is called a trial. Before training, AutoML also _featurizes_ your data, which means it fills in missing values and turns text columns, such as a passenger’s port of embarkation, into numbers that algorithms can use.
“Scores each one fairly” deserves a word, because it’s one of the most important ideas in machine learning. A model that’s tested on the same rows it learned from will look better than it is, the way a student who has seen the exam answers will. So AutoML uses 5-fold cross-validation. It splits the data into five parts, trains on four and tests on the fifth, five times over, and averages the five test scores. Every row gets a turn as test data, and no model is ever graded on data it trained on.
Three lines of Python start the job, wait for it, and register the winner.
from azure_ai.ml_studio import AzureAIMLStudioAuthoringAutomatedML

automl = AzureAIMLStudioAuthoringAutomatedML(dataset_name="heptapod-titanic", cluster_name="tiny-cluster")
job = automl.run_automl_experiment(experiment_name="titanic-survival", target_column="2urvived")
automl.register_best_model(job, model_name="titanic-survival-onnx", model_format="onnx")
This step costs money. You pay for the cluster’s time while the job runs, up to experiment_timeout_hours, which is one hour by default. On tiny-cluster the trials run one after another, and AutoML keeps trying new ones until it reaches the time limit. When I ran exactly these three lines, it finished 46 trials in a little over an hour. At around ten cents an hour for a machine this size, that training run cost less than the coffee. ☕ To finish sooner, pass experiment_timeout_hours=0.5 to run_automl_experiment().
While it runs, open the job in Azure ML Studio. automl.show_run_details(job) prints its link. The Models tab fills in as each trial finishes, and it’s fun to watch the leaderboard change. In my run, the winner was a VotingEnsemble, a model that combines the votes of several of the best trials, with a cross-validated accuracy of 87.5%. When the job finishes, register_best_model() saves the best trial’s model in your workspace under Assets, then Models.
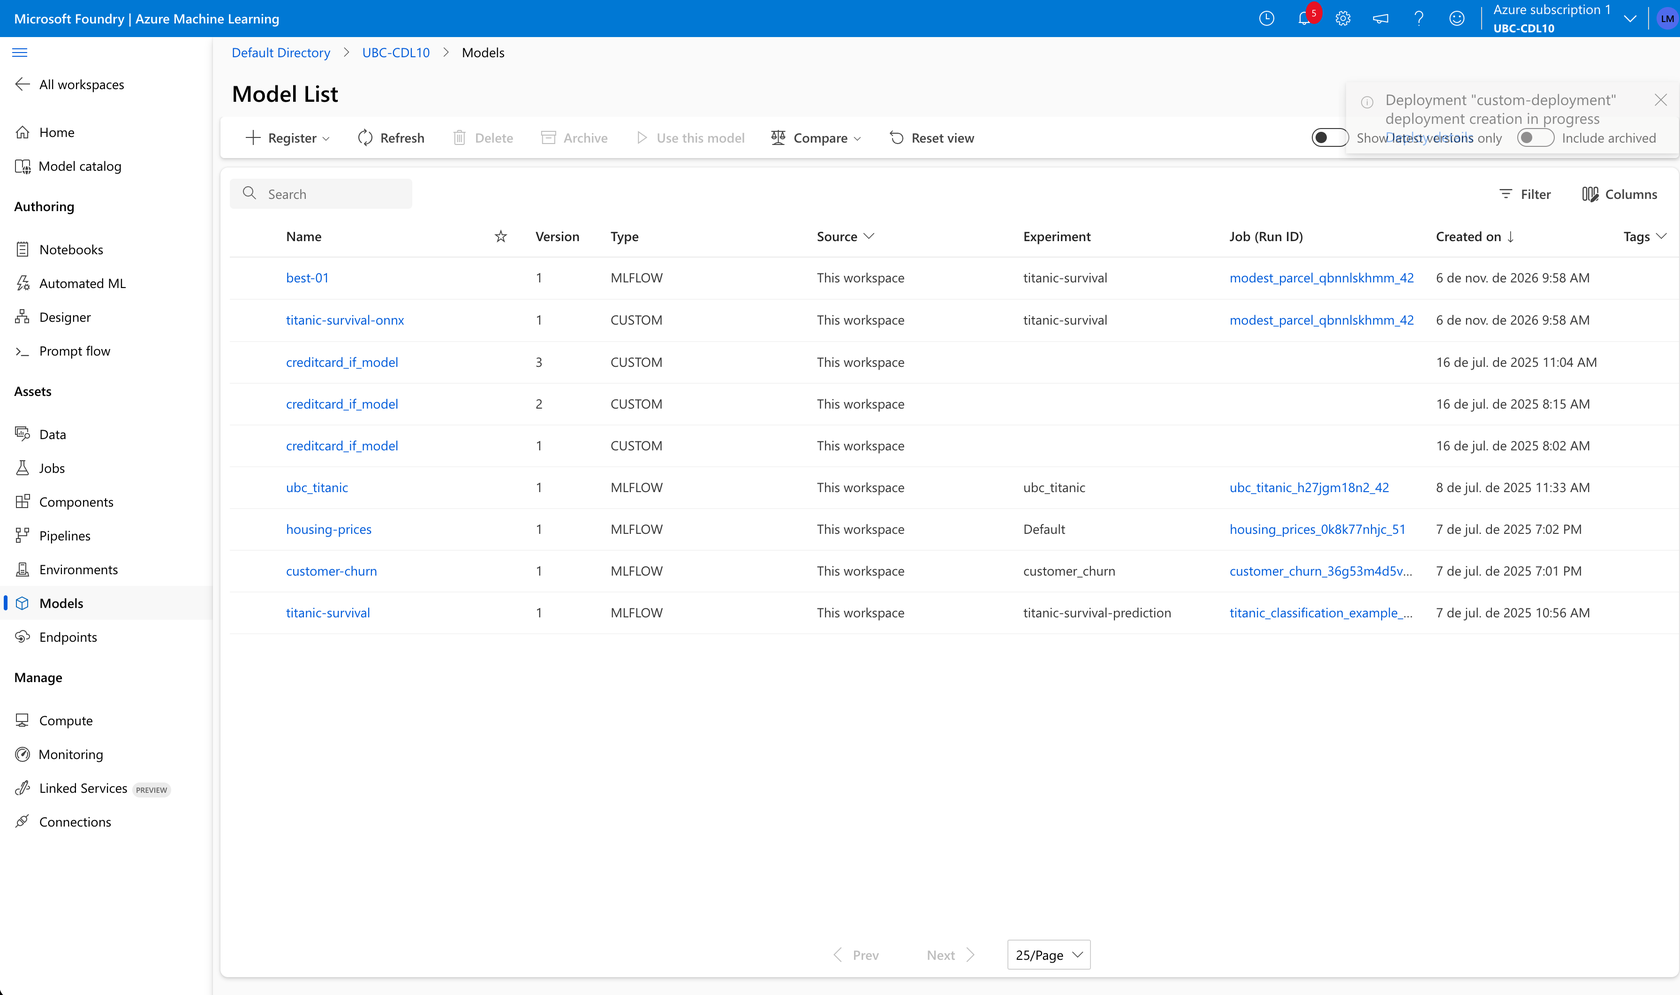
Step 5. Serve the model from an Azure Function
A trained model isn’t much use until something can ask it questions. The titanic-survival-app folder is an Azure Function, a small piece of code that Azure runs for you whenever an HTTP request arrives, and bills by the request rather than by the hour.
It serves the model in ONNX format, and the reason is a useful lesson in how real software ages.
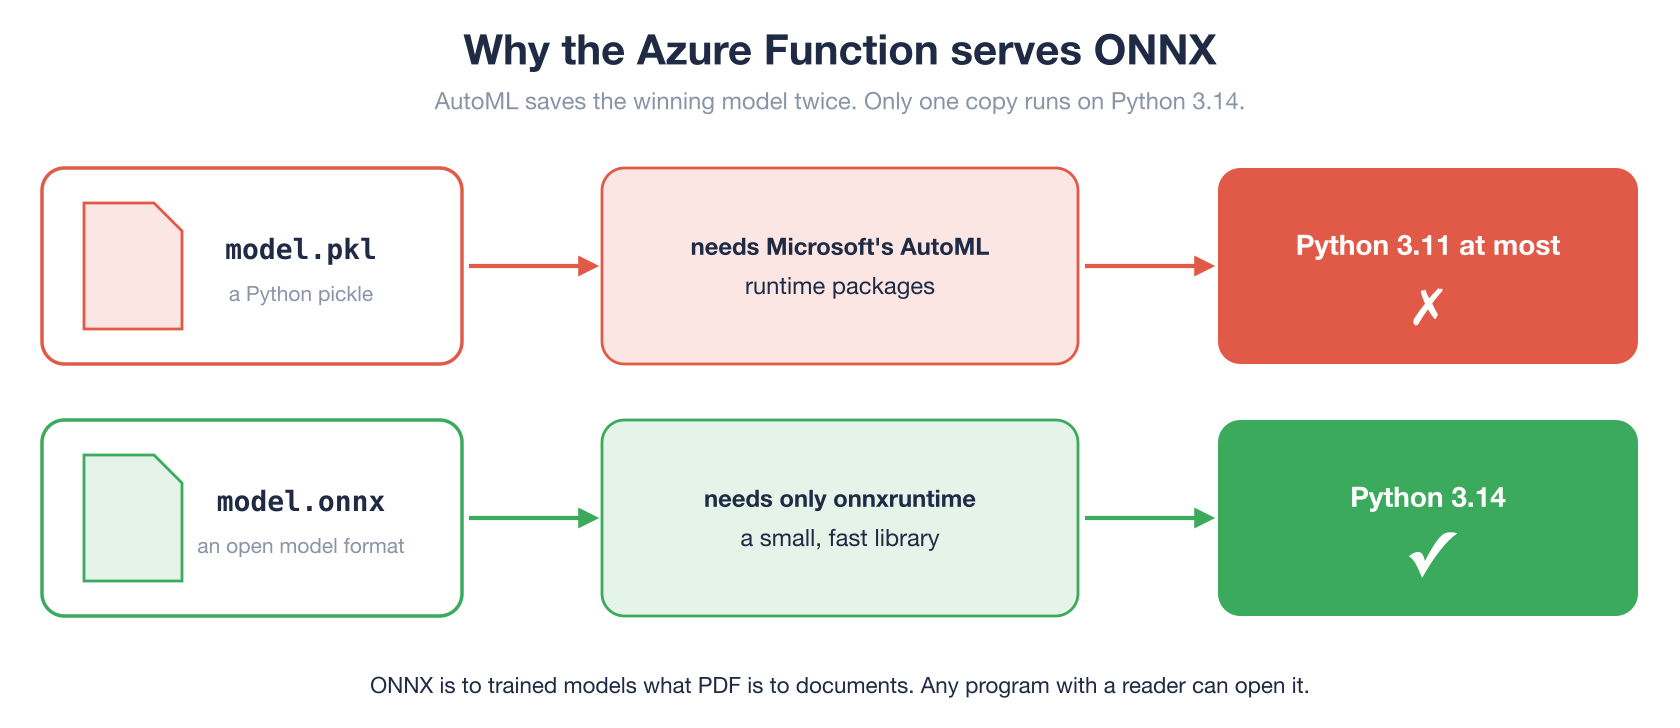
AutoML normally saves a model as a Python “pickle” file, model.pkl. Loading it needs Microsoft’s AutoML runtime packages, and those don’t support Python later than 3.11. ONNX is an open file format for trained models. A small library called onnxruntime can run an ONNX model in any recent Python, with none of AutoML’s code. The AutoML helper class asks for ONNX-compatible models by default, so the winning model is always saved in both formats.
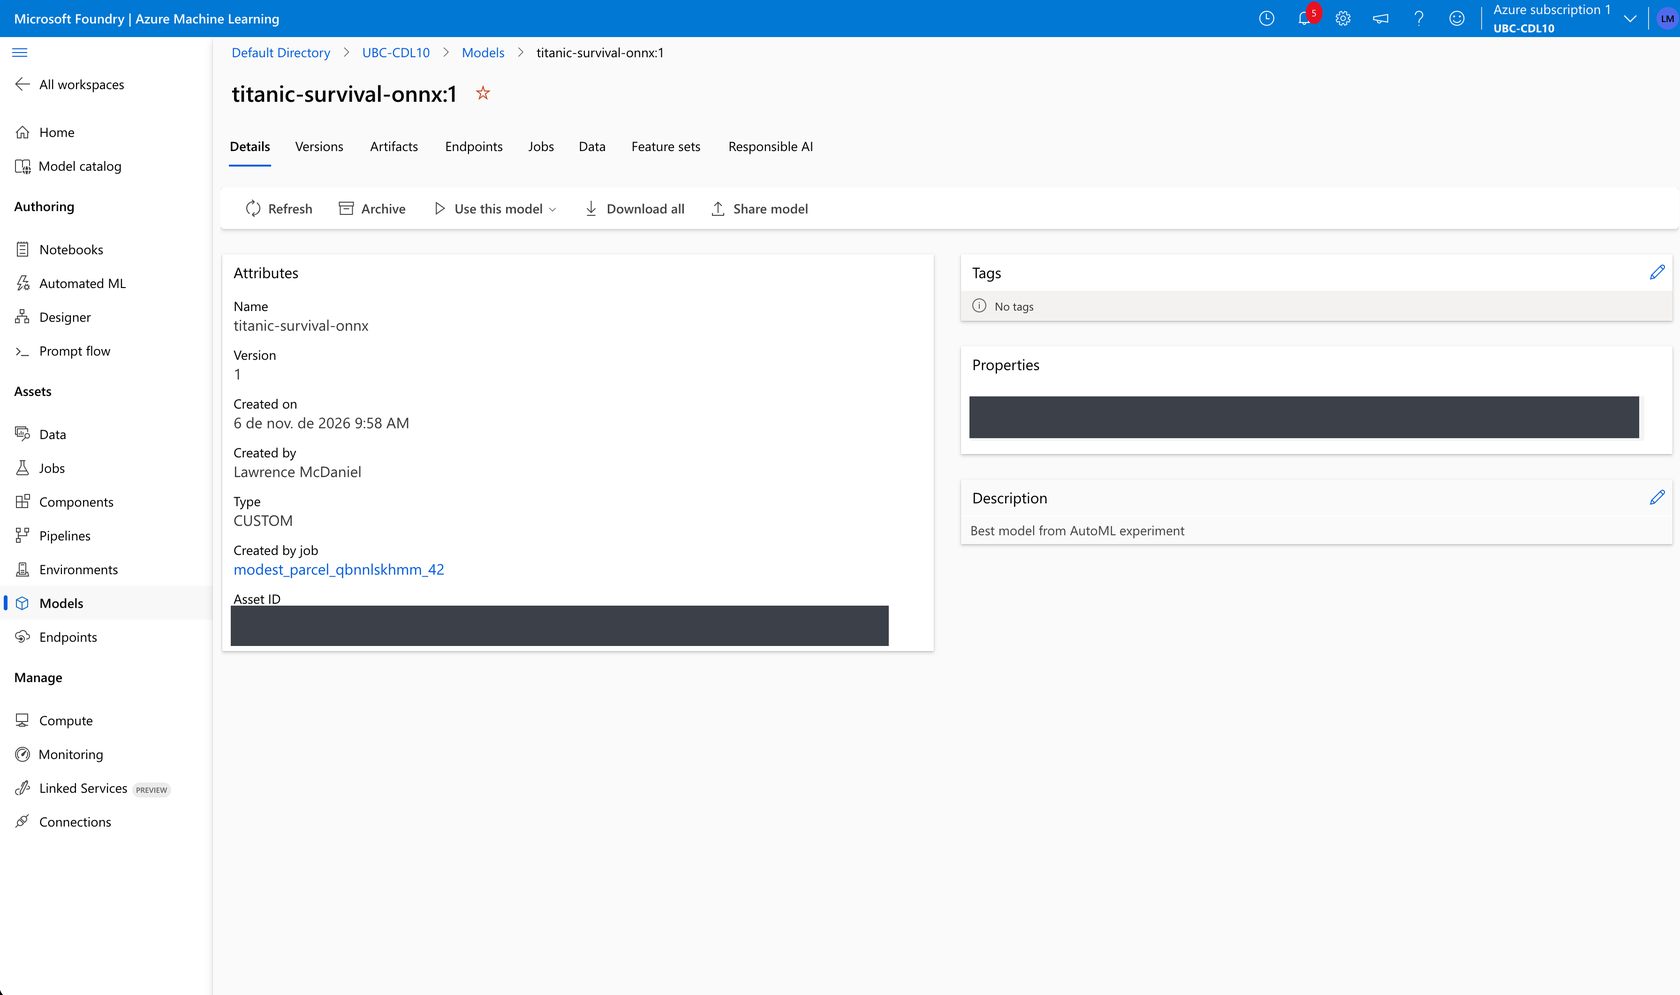
Download the model into the function’s folder, then publish the function with Microsoft’s Azure Functions Core Tools.
az ml model download \
  --name titanic-survival-onnx \
  --version 1 \
  --resource-group <resource-group> \
  --workspace-name <workspace-name> \
  --download-path ./titanic-survival-app/automl-model/

cd titanic-survival-app
func azure functionapp publish <function-app-name>
Then ask it about a passenger. The function key in the header comes from the Azure portal, and like kaggle.json, it’s a secret. Send every column the model was trained on. For this dataset that’s Passengerid, Age, Fare, Sex (0 for male, 1 for female), sibsp, Parch, Pclass and Embarked, plus the dataset’s 19 empty columns, zero and zero_1 to zero_18, which are always 0. If you leave one out, the function’s error message names it.
curl -X POST "https://<function-app-name>.azurewebsites.net/api/predict" \
  -H "Content-Type: application/json" \
  -H "x-functions-key: <function-key>" \
  -d '{"data": [{"Passengerid": 1, "Age": 22.0, "Fare": 7.25, "Sex": 0, "sibsp": 1, "Parch": 0, "Pclass": 3, "Embarked": 2.0, "zero": 0, "zero_1": 0, "...": "...", "zero_18": 0}]}'
The answer comes back as JSON, one prediction per passenger. AutoML turned the 0 and 1 in the 2urvived column into class labels, so the model answers with the strings "True" (survived) and "False".
{"prediction": ["False"]}
A request without the key gets 401 Unauthorized, which is exactly what you want from a model that’s on the public internet.
The deployment guide covers creating the Function App itself, testing it on your own computer with func start before you publish, and troubleshooting. The function’s code, function_app.py, is about 170 lines, most of them comments and docstrings, and it’s worth reading. It loads the model once, on the first request, checks every request carefully, and answers bad input with a clear error message instead of a crash.
The notebooks
The jupyter folder holds three notebooks, which you can run in VS Code, in Jupyter on your computer, or upload to Azure ML Studio under Authoring, then Notebooks. The virtual environment from make init has every package they need. Each notebook is written as a lesson, with an explanation before every cell of code.
Credit card fraud, with an Isolation Forest
anomaly_detection_creditcard.ipynb works with the Credit Card Fraud Detection dataset from Kaggle, 284,807 real (anonymized) card transactions from European cardholders, of which only 492 are fraud. That’s less than two in a thousand. With a needle-in-a-haystack problem like this, a model that says “not fraud” every time is 99.8% accurate and completely useless, which is a great lesson in why accuracy isn’t the only score that matters.
First, download the dataset from Kaggle and register it in your workspace as a data asset named creditcard_fraud. The notebook loads it from there with AzureAIMLAssetsDataset, puts the transaction amounts on the same scale as the other columns with pandas, and trains scikit-learn’s Isolation Forest. It’s an _unsupervised_ algorithm, meaning it never sees which transactions were fraud. It looks for transactions that are unusual instead.
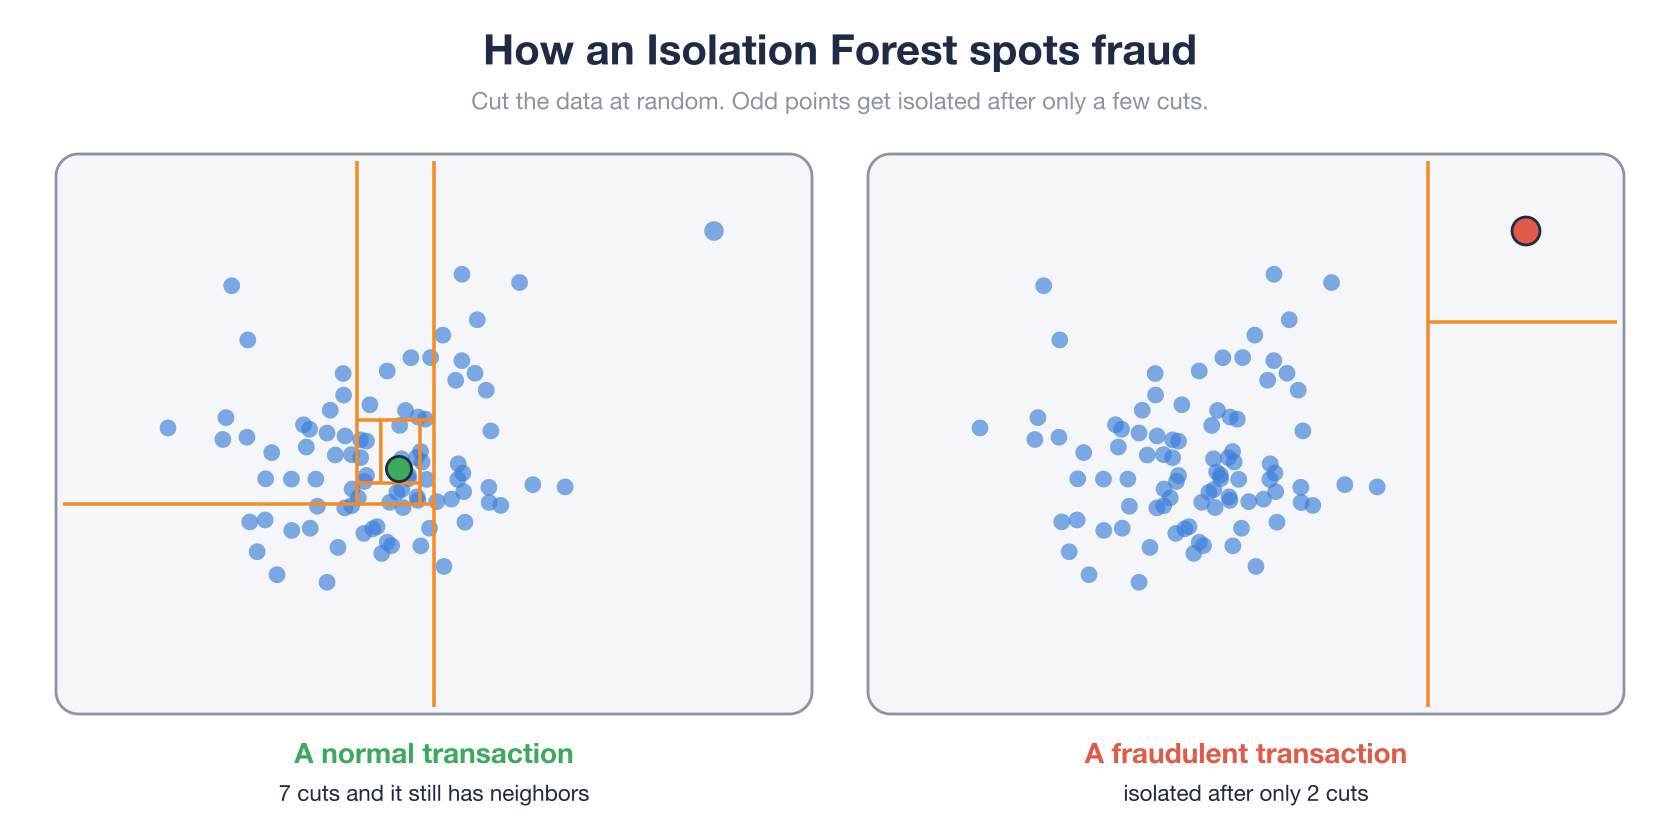
The idea is delightfully simple. Draw random lines through the data, again and again, until every point sits alone in its own box. A normal transaction, surrounded by similar ones, takes many cuts to isolate. A strange one, far from the crowd, takes only a few. The fewer the cuts, the more suspicious the transaction. The forest does this hundreds of times with different random lines and averages the results.
Next, the notebook prints a classification report, which scores how many frauds were caught and how many alarms were false, and draws two seaborn charts, a count of predicted frauds and a box plot of transaction amounts. Then it explains the model with SHAP.
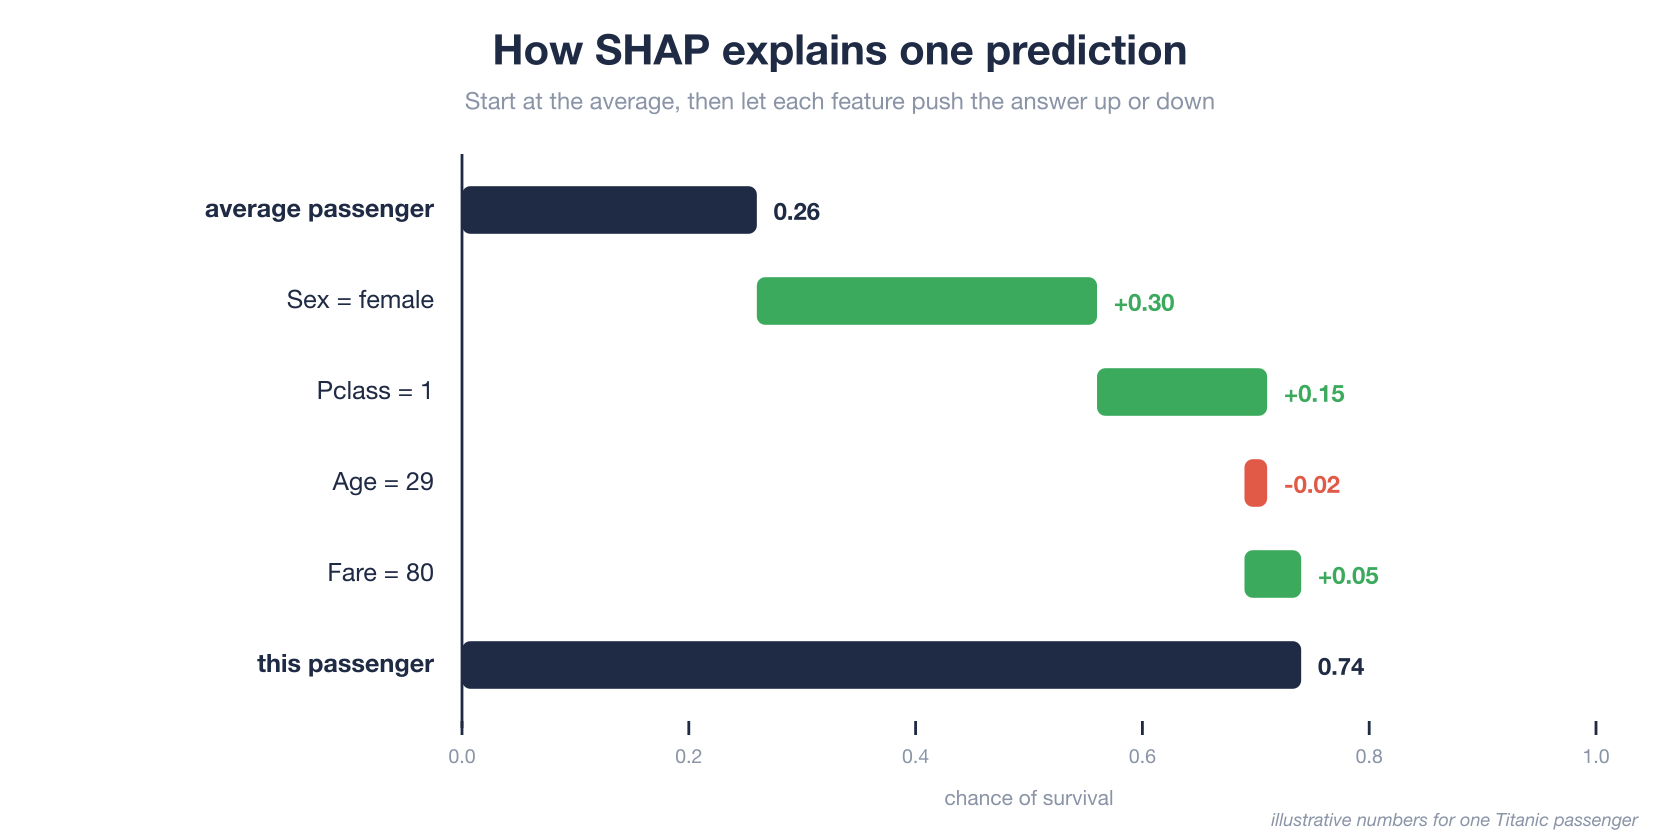
SHAP comes from game theory. It treats each column as a player on a team and works out how much each player contributed to the final score. The picture above uses a Titanic passenger because it’s easy to follow. The average passenger’s survival chance is the starting point, and being female, traveling first class and paying a high fare each push this passenger’s chance up, while age pulls it down slightly. The notebook’s beeswarm plot stacks this kind of explanation for 100 transactions into one chart, so you can see which columns matter most across all of them. Explaining a model is as important as training it, especially when its decisions affect people.
House prices and K-means
House_Prices_Regression_Demo.ipynb predicts a number instead of a yes or no. It downloads Kaggle’s house prices data, keeps the numeric columns, splits the data into training and test sets, trains a linear regression, and plots predicted prices against real ones. k-means.ipynb groups the famous Iris flowers into three clusters with K-means, without being told which species is which, then uses SHAP to show which measurements drove the grouping. Neither needs Azure, so they’re free to run as often as you like.
Code worth learning from
A teaching repository should teach more than the subject. I wrote this one to be read, and to show the habits that make Python code easy to work on.
One pattern, everywhere
Every helper class takes the name of the thing it manages, and offers the same three methods where they make sense. get_default_name() finds an existing one, get_or_create() returns it or makes it, and delete() cleans it up. Once you’ve read one class, you can predict the others. Every public class and function has a docstring that says what it takes, what it returns and what can go wrong, and every log message uses Python’s standard logging. Here’s a typical docstring, from the compute cluster class.
def get_or_create(self) -> AmlCompute:
    """
    Get or create an Azure ML compute cluster by name.

    Uses the cluster_name, vm_size, min_nodes and max_nodes given to the constructor.

    Returns:
        AmlCompute: The compute cluster

    Raises:
        TypeError: If the workspace's compute with this name is not a cluster, e.g. a compute instance
    """
Tests that never cost you money
Testing code that rents cloud computers raises an obvious problem. You want to test often, and you don’t want to pay every time. The repository solves it with one environment variable.
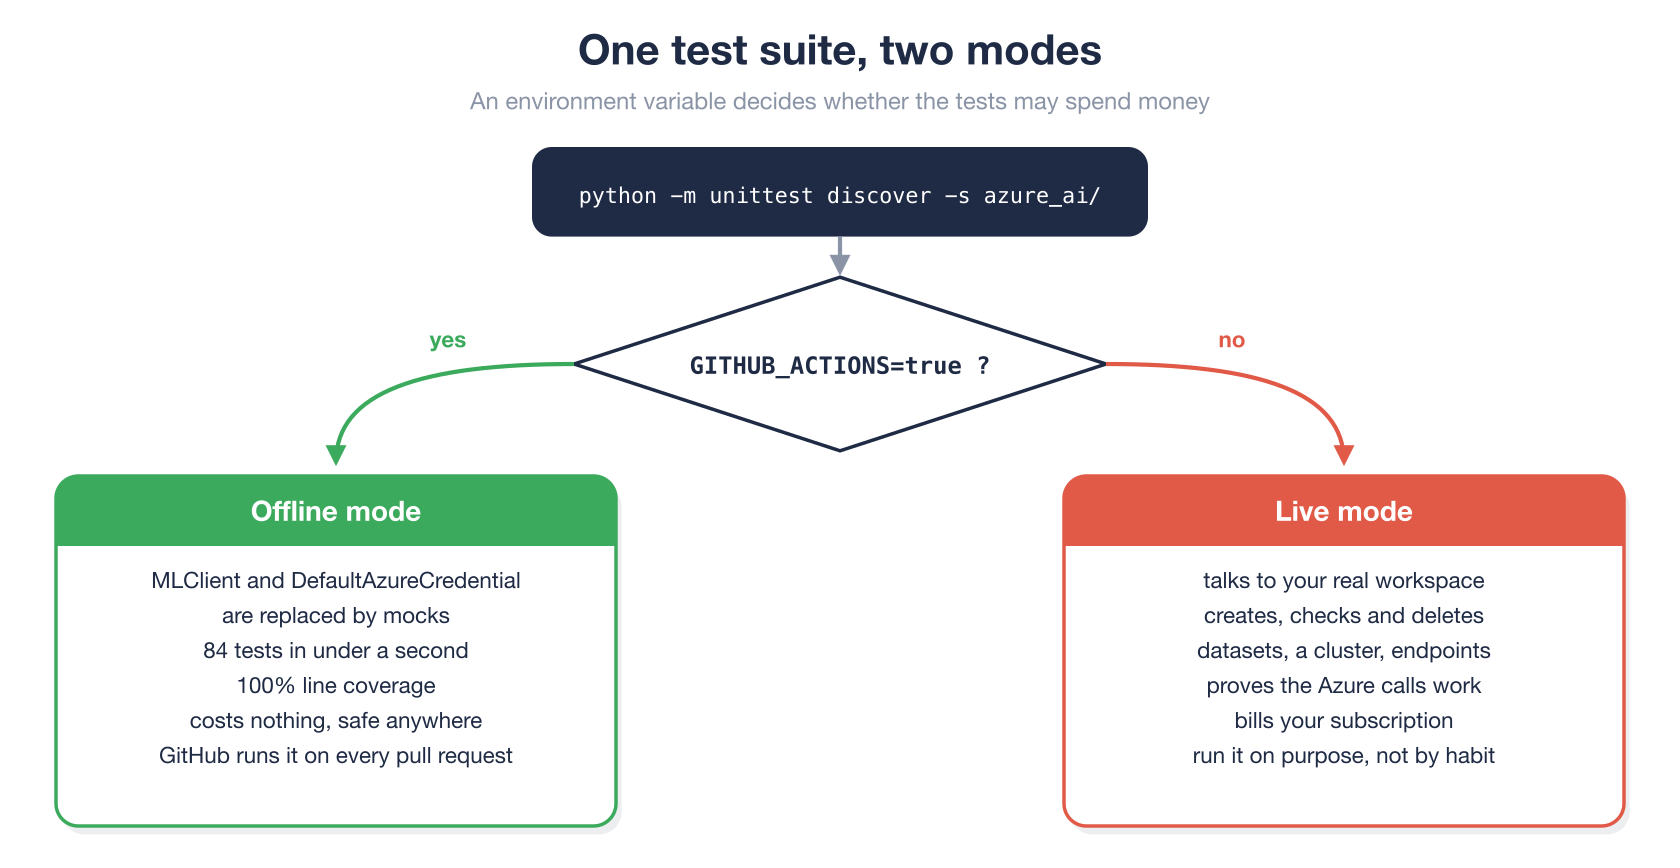
When GITHUB_ACTIONS=true, the tests’ base class swaps the Azure SDK’s MLClient and DefaultAzureCredential for mocks, stand-in objects that answer like the real ones but never leave your computer. All 84 tests then run in under a second and cover every line of the helper classes, the commands and the Azure Function. Without that variable, the same tests run live against your workspace, creating and deleting real datasets, a cluster and endpoints, which proves the Azure calls really work. Run the live tests on purpose, not by habit, because they bill your subscription.
Automation that keeps it honest
The repository uses GitHub Actions to run the offline tests on every pull request and report coverage to Codecov. Before every commit, pre-commit hooks format the code with black and isort, check it with flake8, scan it for security problems with bandit, fix spelling with codespell, and refuse to commit anything that looks like a private key. Version numbers and release notes are generated automatically from the commit messages. None of this is needed to learn Azure ML, but all of it is what you’ll find on a professional team, and here you can see it working on a codebase small enough to understand completely.
What it costs, and how to keep it low
Most of this repository is free to use. Connecting to your workspace, registering a dataset, running the offline tests and running the house prices and K-means notebooks cost nothing, or a fraction of a cent for storage. The costs come from three things. A compute cluster bills while it has machines running, an AutoML job keeps those machines busy for up to its timeout, and an Azure Function bills a tiny amount per request.
Three habits keep the bill small. Always create clusters with a minimum of zero machines and a short idle timeout, as in step 3. Keep AutoML’s timeout short while you’re learning. And when you finish a course, delete the resource group, which deletes everything inside it in one go.
az group delete --name <resource-group>
Where to go next
Clone it, run it, break it, and read the code. If you’re a student, I’d love to see your pull requests. Contributed notebooks go in the repository’s docs/contrib folder, and contributing to a real, tested codebase is a great thing to have on your résumé. Questions and bug reports are welcome on the GitHub Issues page.