
Getting Started with Smarter’s CLI

smarter is the command-line interface of The Smarter Project. It is to the Smarter API what kubectl is to Kubernetes. You describe a resource in a YAML file, and smarter apply makes the platform match it. The same program lists and describes what’s already there, checks a manifest before you apply it, prompts an LLMClient from your terminal, deploys it to a public url, and deletes it when you’re done. It’s a single binary, written in Go, for macOS, Linux and Windows.
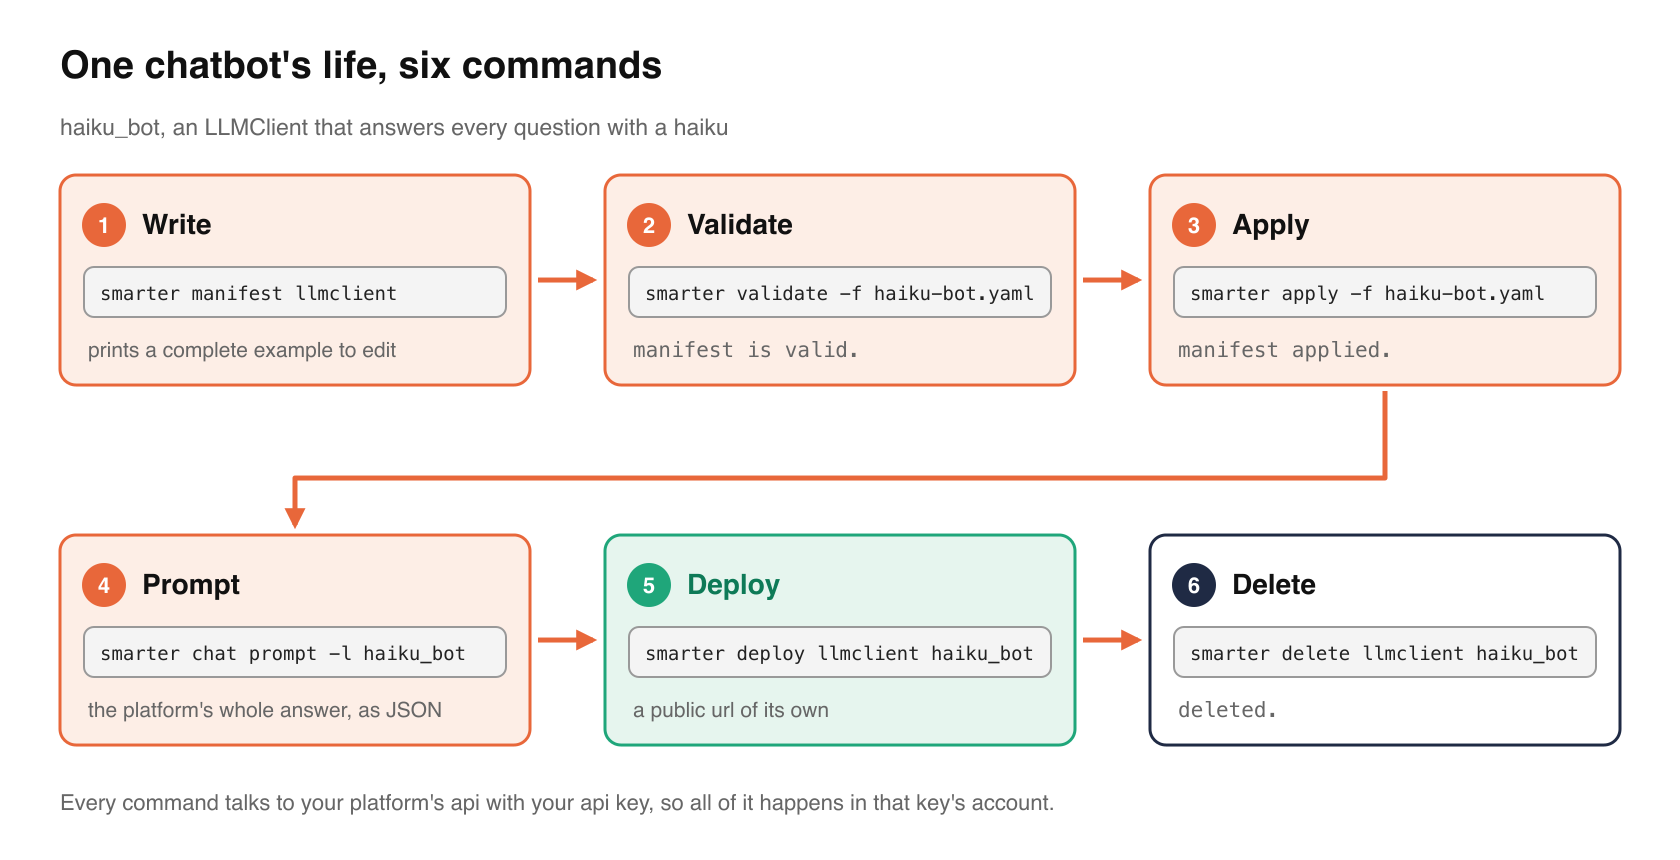
This article takes one chatbot, a small LLMClient that answers every question with a haiku, through its whole life. You’ll write its manifest, validate it, apply it, prompt it, deploy it and delete it. Every command and every output below was run against a Smarter platform.
Before you start
You need a Smarter platform to connect to, and a Smarter api key. The platform can be your own laptop, because the Quick Start Guide runs one locally on http://localhost:9357. To create an api key, see API Keys. An api key acts as the user who owns it, so everything below happens in that user’s account.
Install it
On macOS or Linux, with Homebrew.
brew tap smarter-sh/tap https://github.com/smarter-sh/homebrew-tap
brew trust smarter-sh/tap
brew install smarter
On Ubuntu, from its Launchpad PPA.
sudo add-apt-repository ppa:lpm0073/smarter-cli
sudo apt-get update
sudo apt-get install smarter-cli
On Windows, with Chocolatey.
choco install smarter
There’s also a Docker image, mcdaniel0073/smarter-cli, and a binary for every platform on the releases page. Check the install with smarter version.
Configure it
smarter configure asks for these, plus your preferred output format, and writes them to ~/.smarter/config.yaml, a file that only you can read.
- root_domain is your platform’s domain, such as
platform.example.com. - account_number is your Smarter account number, such as
3141-5926-5359. - api_key is your 64-character api key. It’s masked as you type it.
- username is the name you sign in to the web console with.
Pressing enter keeps the value shown in parentheses, so you can run configure again to change one thing.
The cli can keep a key for each of five environments, named local, alpha, beta, next and prod, the default. Choose one with --environment. local is always http://localhost:9357, which is where the Quick Start runs, and the others are derived from your root domain.
Every setting can also come from an environment variable, which takes precedence over the file. That’s the usual way to run the cli in CI/CD, or against a platform you don’t want in your configuration.
export SMARTER_API_KEY="your 64-character Smarter api key"
export SMARTER_BASE_URL="http://localhost:9357"
The Smarter SDKs for Python, Node.js and Go read the same file and the same variables, so once the cli works, they do too.
Now check who you are.
smarter whoami
It prints the api key’s owner, which is their user, their account and the platform’s environment. It’s the cheapest way to check that a key works.
Look around
smarter resources lists the kinds of resource that the platform has, such as LLMClients, Plugins, Connections, Secrets, Guardrails, Budgets and the rest. smarter get lists the resources of one kind. Its output is JSON by default, and -o yaml and -o tabular are also available. Tabular is the easiest to read.
smarter get llmclients -o tabular
name              url                                                           deployed
----              ---                                                           --------
calculator        http://calculator.3141-5926-5359.api.local.smarter.sh/        true
customer_support  http://customer-support.3141-5926-5359.api.local.smarter.sh/  true
example           http://localhost:9357/workbench/llm-clients/rMTAwMDAwNgx/     false
openai            http://localhost:9357/workbench/llm-clients/rMTAwMDAxMQx/     false
(The real table has a few more columns, such as when each LLMClient was created and last updated.)
A deployed LLMClient has a public url of its own. One that isn’t deployed is reached through the web console’s workbench.
smarter describe returns one resource as a manifest, ready to save, edit and apply again.
smarter describe llmclient openai -o yaml > openai.yaml
Write a manifest
Every Smarter resource is declared in a Smarter Application Manifest (SAM), which has apiVersion, kind, metadata and spec, like a Kubernetes manifest. You don’t have to start from a blank file. smarter manifest prints a complete example of any kind, with every field filled in.
smarter manifest llmclient > llmclient-example.yaml
Most fields are optional. Here’s the haiku bot, saved as haiku-bot.yaml.
apiVersion: smarter.sh/v1
kind: LLMClient
metadata:
  name: haiku_bot
  description: Answers every question with a haiku.
  version: 1.0.0
spec:
  config:
    prompt:
      provider: openai
      defaultModel: gpt-6-luna
      defaultSystemRole: You answer every question with a single haiku.
      appName: Haiku Bot
      appAssistant: Basho
      appWelcomeMessage: Ask me anything. I answer in seventeen syllables.
      appExamplePrompts:
        - What is Kubernetes?
        - Why is the sky blue?
provider and defaultModel choose the LLM, and defaultSystemRole is the system prompt that starts every conversation. The app fields are what the chat window shows, which is its title, the assistant’s name, a welcome message and a few example prompts.
Validate it
smarter validate asks the platform to check a manifest against its kind’s model, without saving anything. Here’s what it says about a manifest with a mistake in it, defaultTemperature: warm.
smarter validate -f haiku-bot.yaml
spec.config.prompt.defaultTemperature: Input should be a valid number, unable to parse string as a number

Error: manifest has 1 error(s)
Each error names the field and the problem, and the command exits with status 1, so a CI job that runs it fails. With the mistake fixed, it prints manifest is valid. smarter apply --dry-run does the same check.
Apply it
smarter apply -f haiku-bot.yaml
manifest applied.
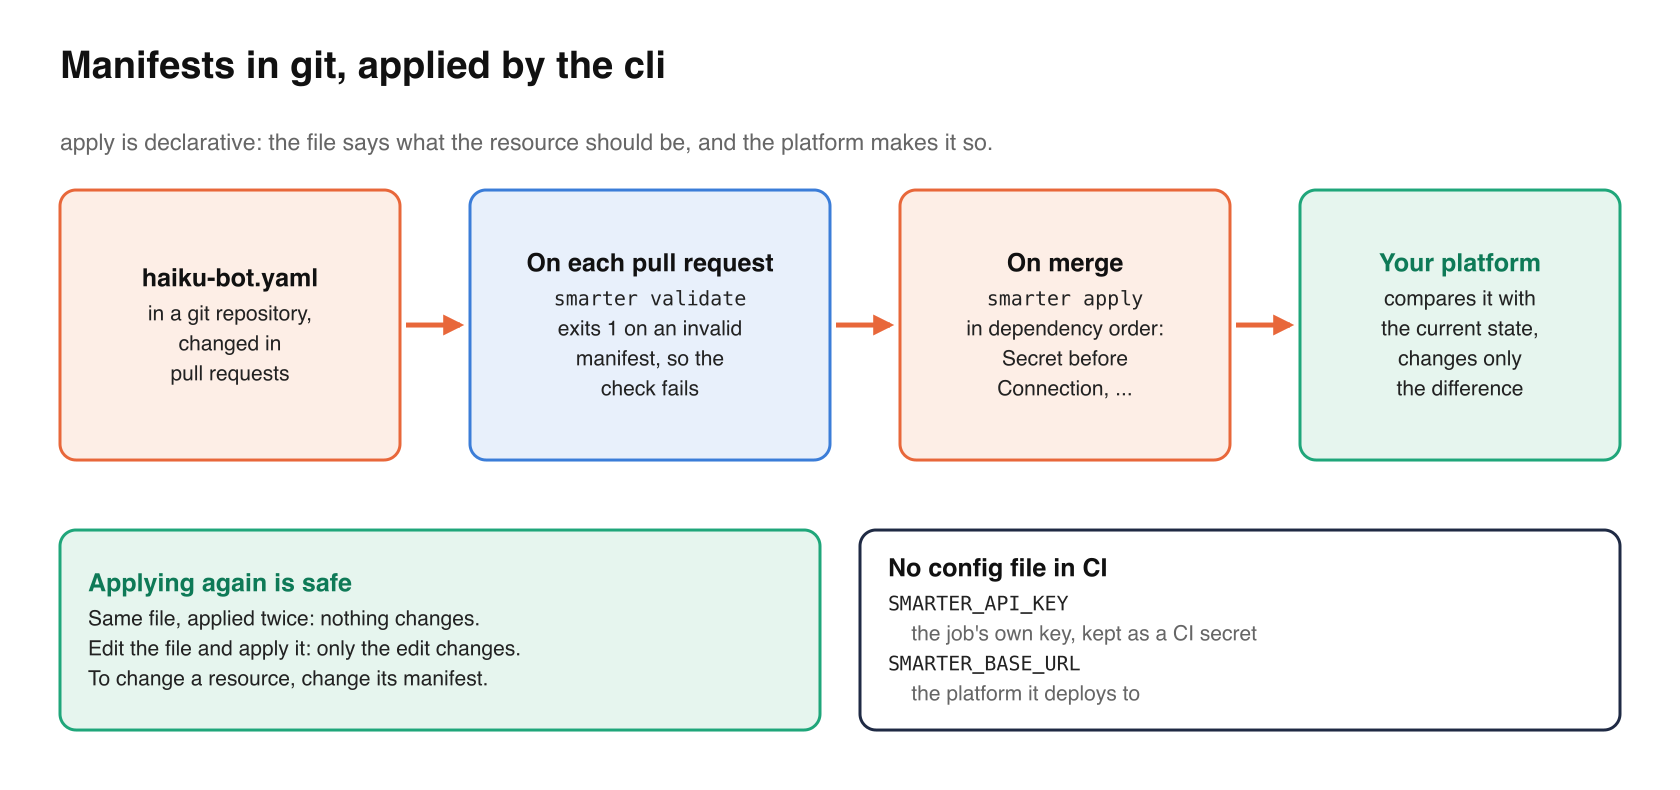
That’s it. haiku_bot now appears in smarter get llmclients and in the web console. apply is declarative. The platform compares the manifest with the resource’s current state and makes only the changes that the difference requires, so applying the same file again is safe, and changing the resource means editing the file and applying it again. That’s what makes a folder of manifests in a git repository, reviewed in pull requests, a workable way to run a Smarter account.
Prompt it
smarter chat prompt --llmclient haiku_bot --prompt "What is Kubernetes?"
The response is the platform’s whole answer as JSON, including the messages that were sent, the LLM’s reply, any tool calls, and the tokens that the prompt was charged. That’s useful for debugging. To see only the reply, pipe it through jq.
smarter chat prompt -l haiku_bot -p "What is Kubernetes?" \
  | jq -r '.data.response.data.body.choices[0].message.content'
A harbor for containers
Kubernetes steers their fleets
Across cloud and machine
A prompt runs exactly as it would in a chat window. The platform adds the LLMClient’s system prompt, calls the LLM, runs any Plugins that the LLM asks for, applies the LLMClient’s Guardrails, and bills the tokens to the LLMClient’s owner, like any other prompt. smarter chat config --llmclient haiku_bot returns the configuration that a chat window loads, which is the name, the welcome message, the example prompts and the styles.
Deploy it
So far, haiku_bot can be reached only through the platform’s api and the web console. Deploying it gives it a url of its own, which a web page can embed.
smarter deploy llmclient haiku_bot
Its url has the form https://haiku-bot.<account-number>.api.<your-smarter-domain>/, or a custom domain of your own. smarter get llmclients shows it once the deployment is done, and smarter undeploy llmclient haiku_bot takes it down again. To put the deployed chatbot on a web page, see How to Embed a Smarter Chatbot in an HTML Web Page, or Getting Started with @smarter.sh/ui-chat for a React app.
deploy also works for API keys, custom domains, vectorstores, self-hosted LLMs and the compute they run on. Run smarter deploy --help for the list.
Clean up
smarter delete llmclient haiku_bot
deleted.
delete is permanent, so describe the resource to a file first if you might want it back.
Using the cli in scripts and CI/CD
A few properties make the cli easy to automate.
- Exit codes. A failed command exits with a non-zero status, so a script can stop on the first error.
validateexits 1 for an invalid manifest. - Machine-readable output. JSON is the default, and
-o yamlgives you manifests you can save. Tabular output is only forget, and is meant for people. - Configuration from the environment. In CI, give the job its own api key in
SMARTER_API_KEY, as a CI secret, and setSMARTER_BASE_URLto the platform it deploys to. No configuration file is needed. - Retries. Requests that fail for a transient reason, such as a rate limit or a gateway timeout, are retried twice by default (
--max_retries), and each one waits up to two minutes (--timeout).
A typical pipeline runs smarter validate on every manifest in each pull request, and smarter apply when the pull request is merged. Apply the manifests in dependency order, so that a Secret exists before the Connection that names it, and a Plugin before the LLMClient that uses it. Getting Started With smarter-api shows how to work that order out with SAMKinds.apply_order().
To write manifests with completion and validation as you type, smarter json-schema llmclient > llmclient.schema.json gives you the JSON Schema that the platform validates against, which any YAML-aware editor can use. In VS Code, the Smarter Manifest extension does this for every kind, and runs the cli’s validate, apply and deploy commands from the editor.
Where to go next
Every command has --help, and smarter <command> <kind> --help describes each kind. The haiku bot is the smallest useful LLMClient. Its manifest is also where you give it Plugins that query a database or call an api, Guardrails, a Budget and its chat window’s styles, and the cli applies all of them the same way.
Have fun with your first chatbot. 🤩